Admin App
The admin app is where PanHunter users and projects are managed.
Users are classified either as a Standard User or as a Global administrator.
Within a project, from least to most capabilities, users are divided into Guests, Data Analysts, Data Managers, and Project Leaders.
Each project role gets all the capabilities of the previous ones.
Global Administrators, unless specified otherwise, get the capabilities of all of the roles.
1 - Basic Capabilities
A user can exist without additional connection to a project, though the utility is quite limited, with the most obvious utility being the contact form.
Capabilities in this section are those accessible to all PanHunter users.
1.1 - Communicating With PanHunter: Using The API Key
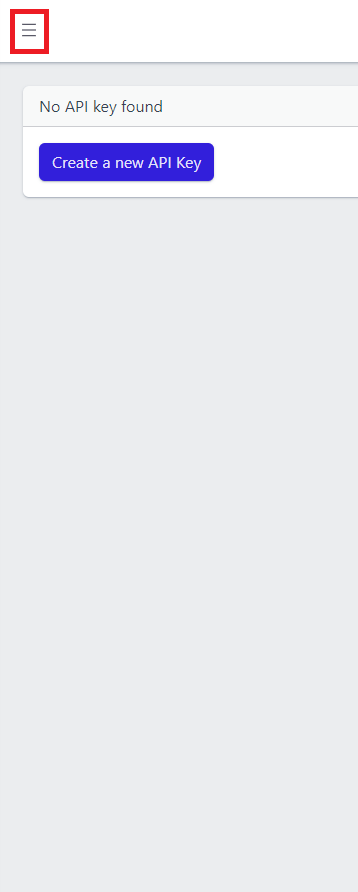
The Api Key section in the sidebar leads to the page where users can manage their API Key.
API keys allow developers to access PanHunter from scripts or custom apps.
Creating An API Key
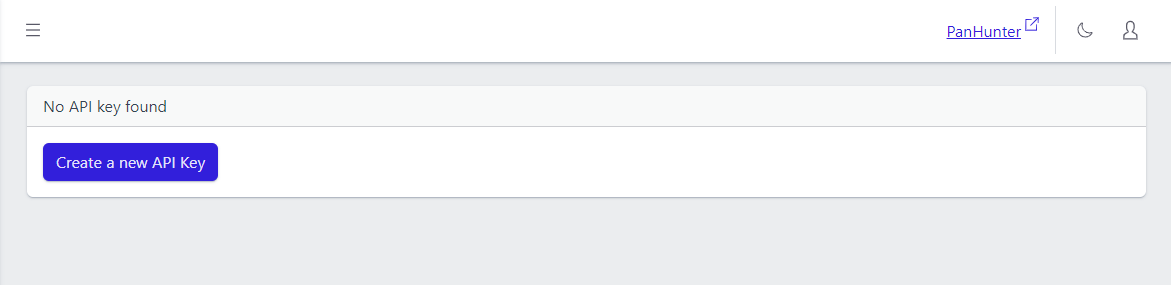
The API key page allows the creation of an API Key if no API Key currently exists.
Clicking on Create New Api Key will display the newly created key exactly once, with a button to copy it to the clipboard.
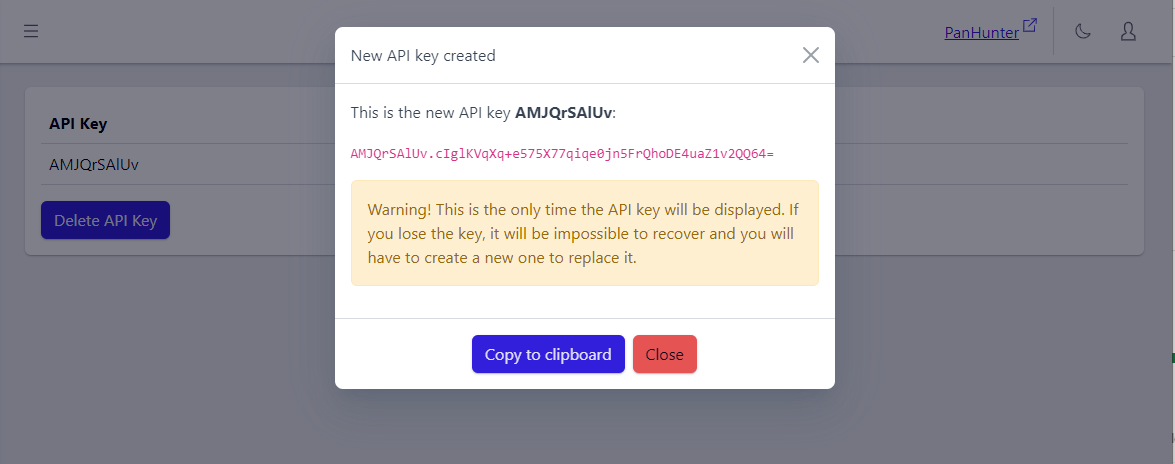
Info
Make sure to record this key! The full key will not be displayed again.
Displaying An API Key
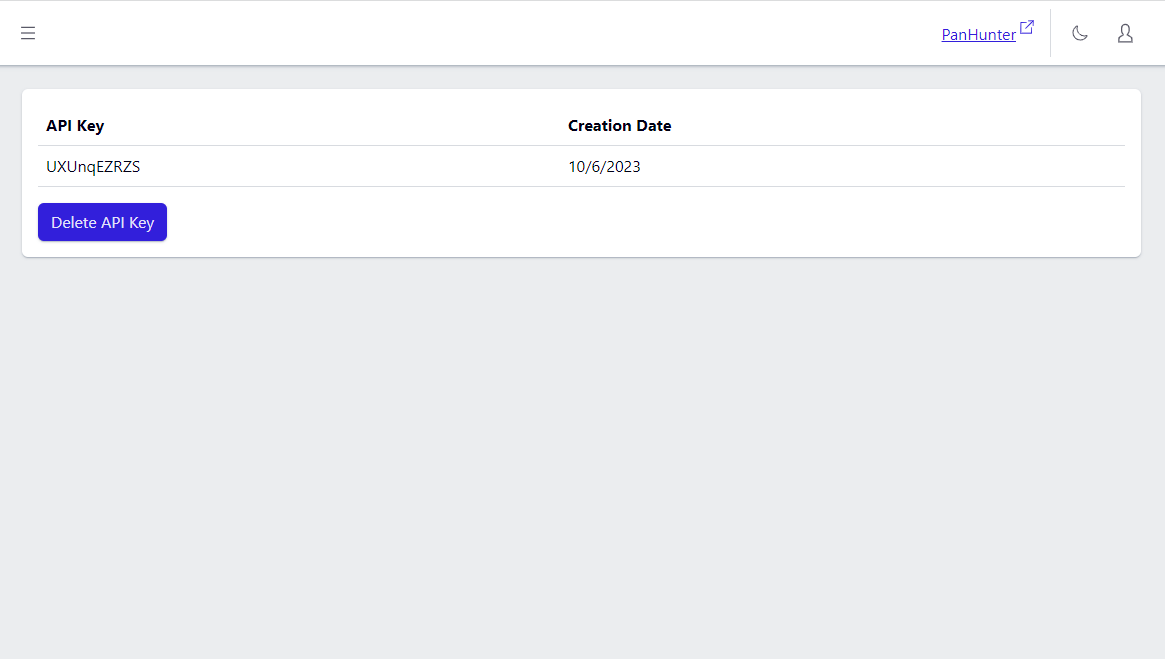
The API key identifier, creation date, and delete button will be displayed.
It is not possible to view the full API key: if it is lost at this point, it will be necessary to delete the current key and create a new API key.
Using An API Key
One possible application for our API keys would be connecting custom applications to PanHunter.
The API Key lets developers obtain PanHunter information via its APIs. APIs exist to retrieve project and user information, or data stored in PanHunter.
The API keys are used by adding the header
X-API-KEY: <api key>
to an HTTP request made to the PanHunter API.
1.2 - Giving Feedback: Using The Contact Form
A contact form is accessible to all users.
This contact form, once filled, sends the information given to the PanHunter support team (panhunter_support@evotec.com).
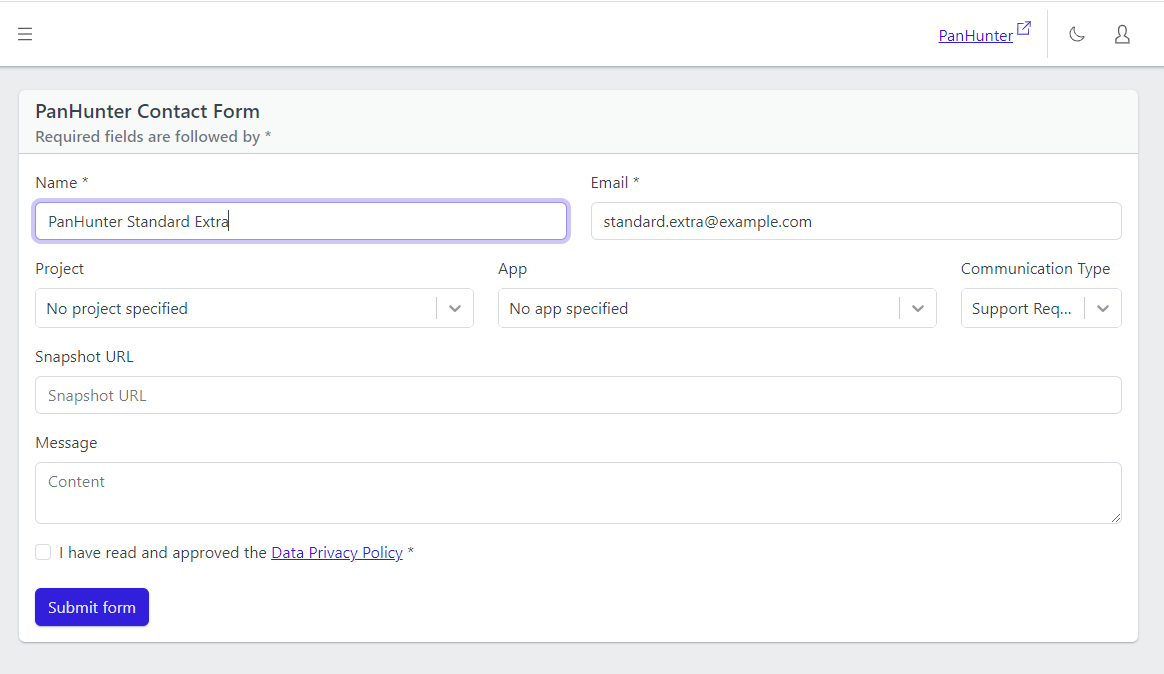
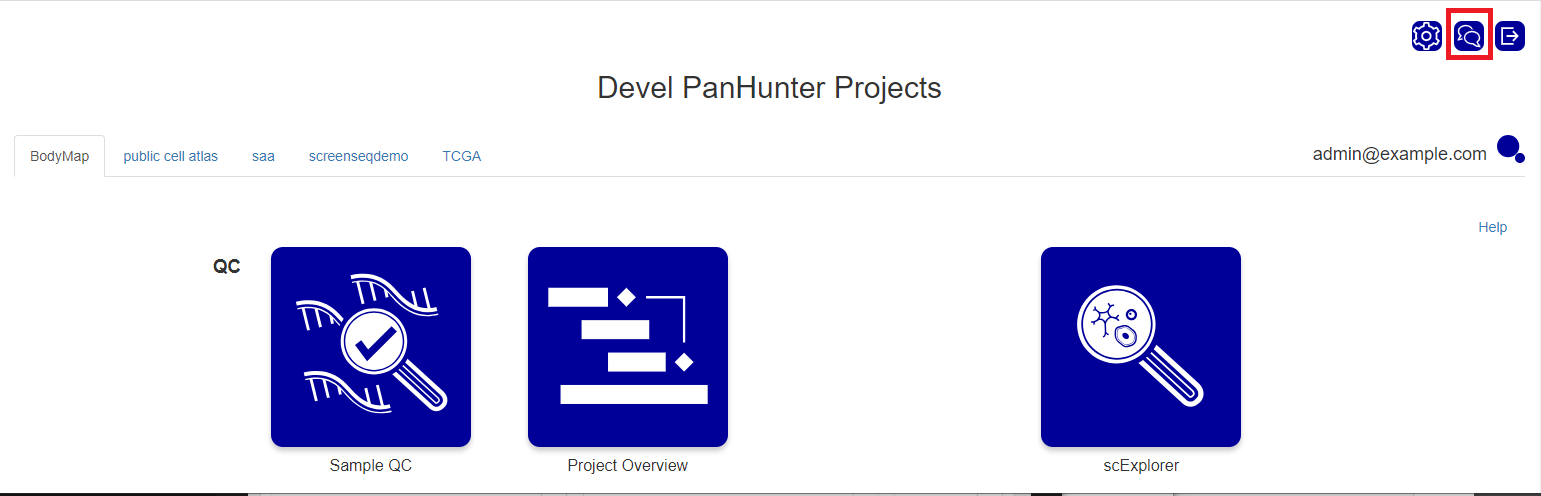
Users can access the contact form either by going directly to the admin app and selecting Contact or by clicking the “Contact” icon in PanHunter. This icon should appear both on the start page and within the apps and is displayed in the following picture within the red square.
The form will autofill some of the information depending on how it is reached.
The following sections will give a few more details about each of the parameters:
Name
Required.
Autofills with the user’s first name and last name if available.
The name of the person the PanHunter support team team should communicate with.
Email
Required.
Autofills with the user’s registration e-mail.
The e-mail to use for further contacts.
Project
Optional.
Autofills if the contact form was reached via a link in a PanHunter App.
The project where the user noticed what they want to communicate to the support team.
App
Optional.
Autofills if the contact form was reached via a link in a PanHunter App.
The app where the user noticed what they want to communicate to the support team.
Communication Type
Required.
Defaults to Support Request.
The user can select whether their communication should be classified as a Support Request, a Bug Report, or Feedback.
Snapshot URL
Optional.
Autofills if the contact form was reached via a link in a PanHunter App.
The URL for a snapshot of PanHunter.
A snapshot saves the state of PanHunter at the time when it was taken, allowing for a quick reproduction of the user’s setup.
Message
Optional.
Message to the support team.
1.3 - Quality Of Life Features
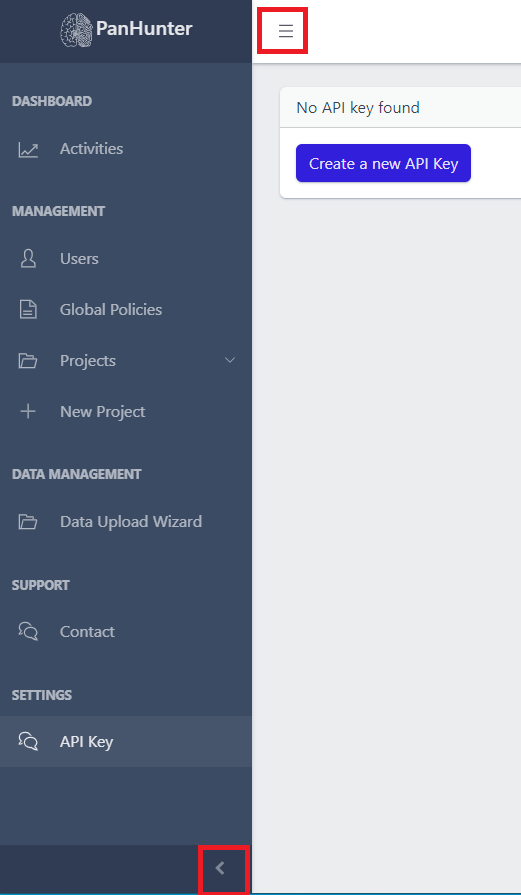
All of the sections of the app a user has accessed to to are displayed in a hideable sidebar. Clicking on “Projects” unfolds a subsection with the names of the projects a current user has access to. Clicking on one of these project names leads to that particular project’s details.
The sidebar can be displayed or hidden by clicking either the arrow in the bottom left of the app or the three lines at the top left.
Light Mode and Dark Mode


There is an icon at the top of the screen allowing change to light mode (a sun) or to dark mode (a moon) depending on the current mode.
Returning To PanHunter

The PanHunter link brings a user back to the PanHunter Start Page.
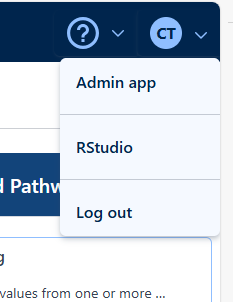
Logging Out

Clicking on the person symbol in the top right corner displays the current user’s username and a logout button.
Clicking the person again hides the username and the logout button
2 - Guest
A project guest can view things within a project, but not run any analysis themselves - this is mainly for showcasing a project to someone, letting them interact with already performed analyses.
2.1 - Basic Data: Viewing Project Information
All members of a project can see basic information of that project, by going to Projects in the sidebar and clicking on the corresponding project name.

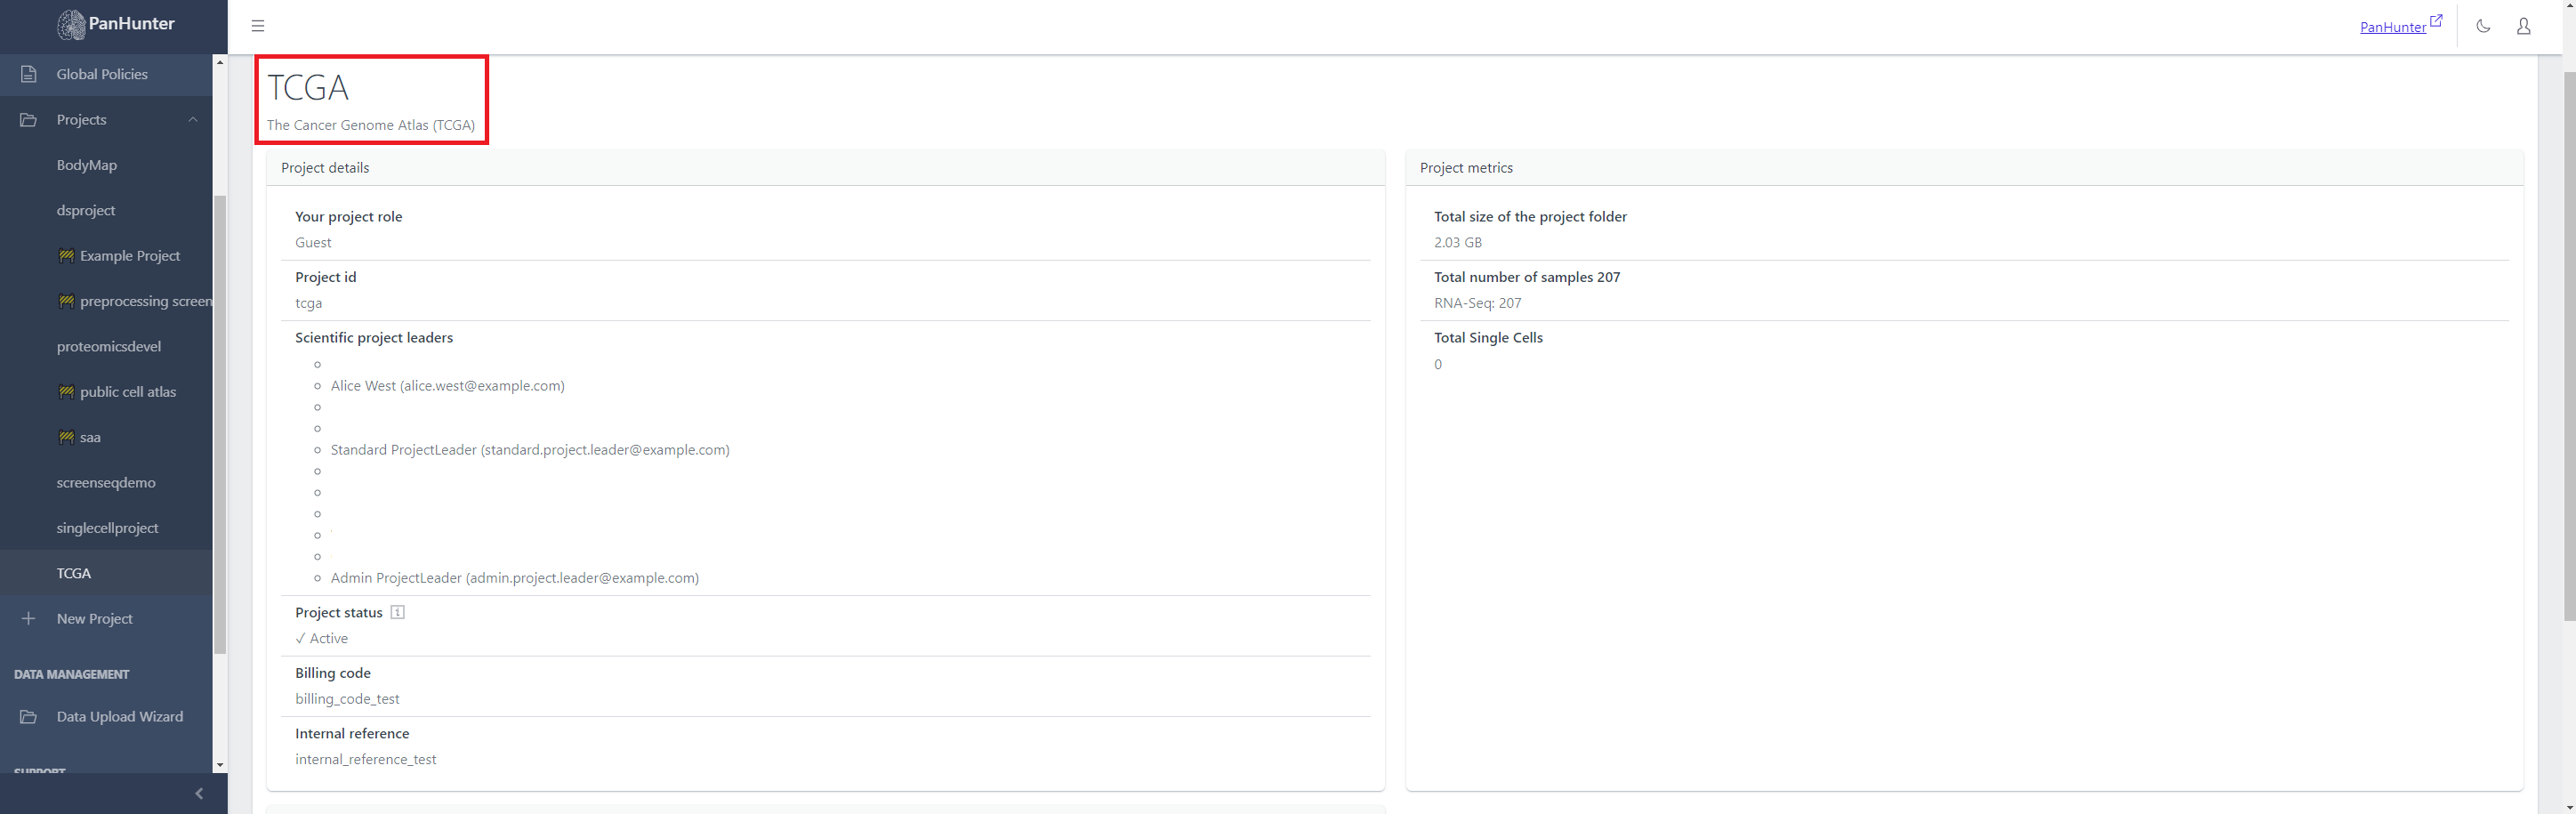
A user can see the project name, description, additional information set by project leaders in project details, and project metrics.
Name and Description
The name of the project is in the top row in the project Information tab. The following lines are the project description.
Project Details
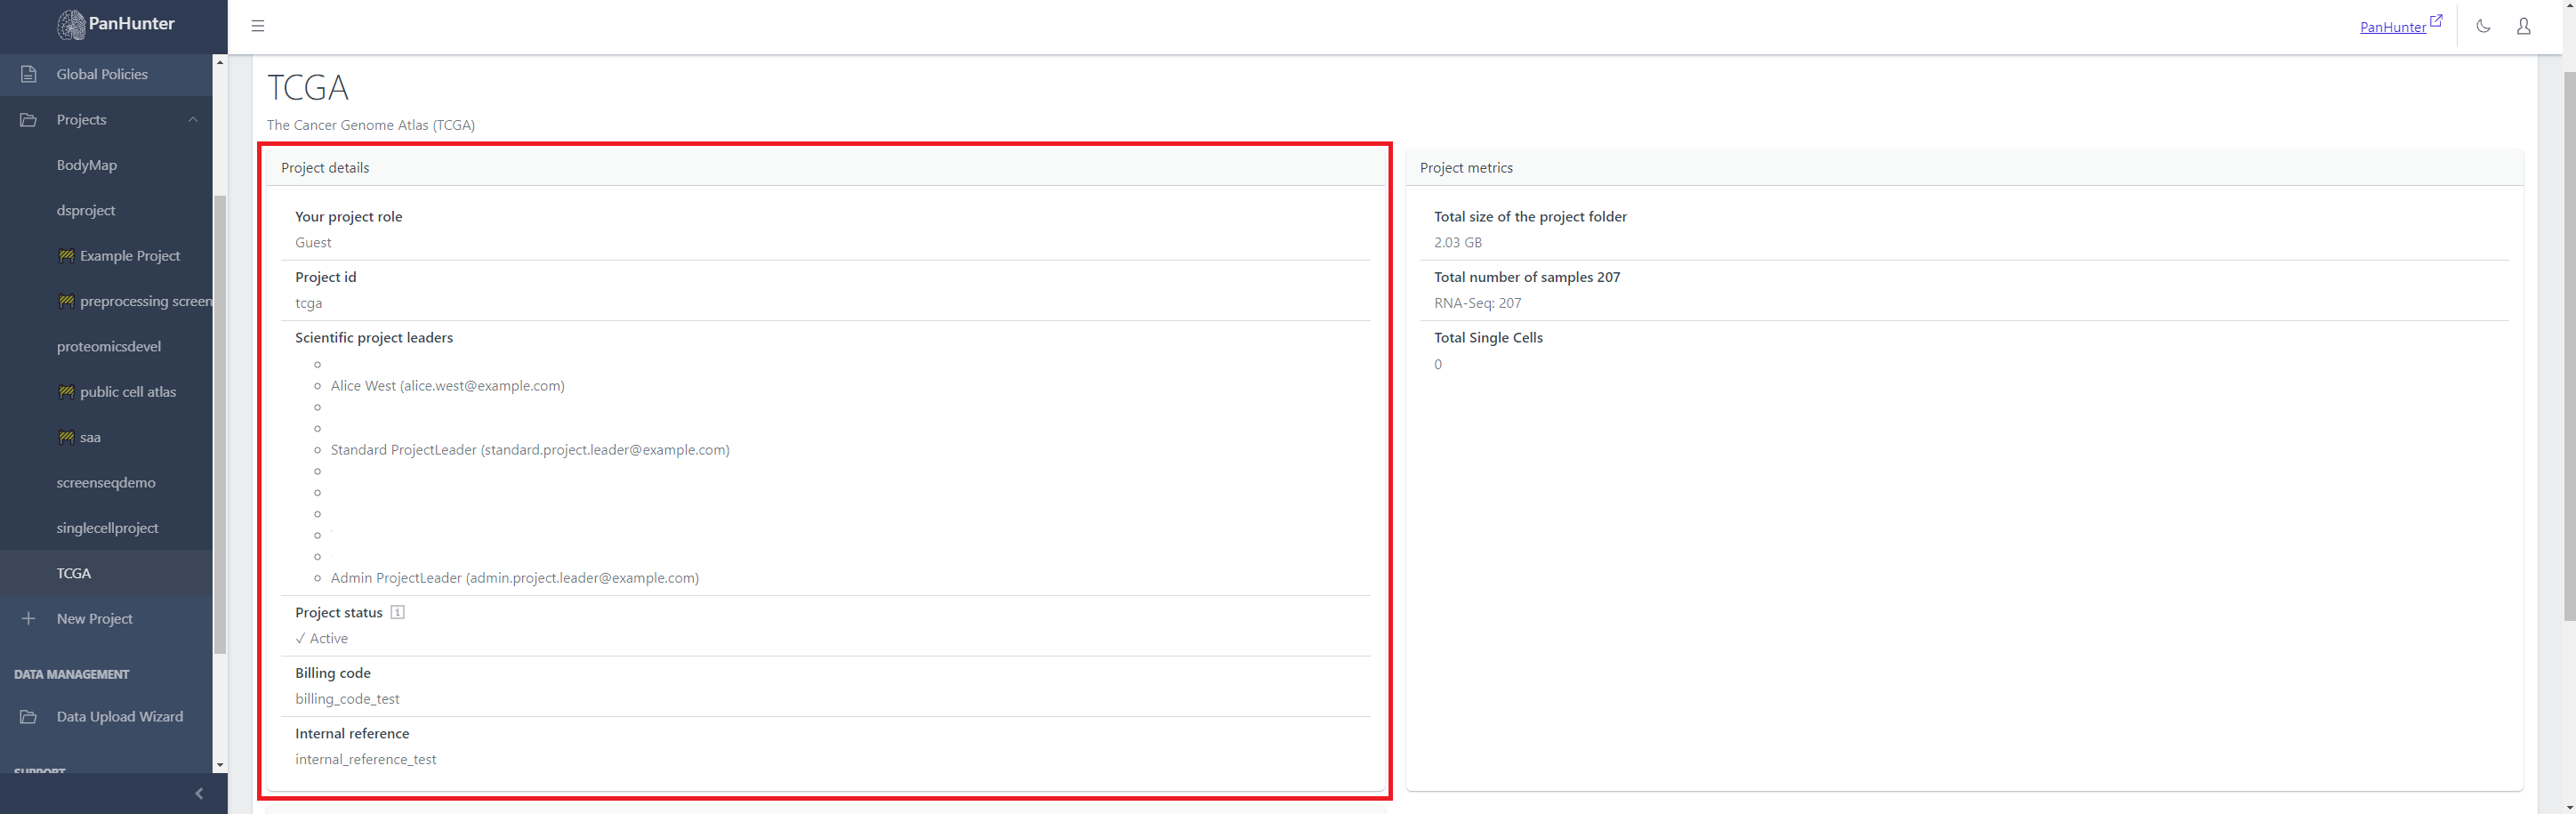
This is information about the project that project leaders can set or edit.
This information is:
- the role of current user (guest/analyst/data manager/project leader), determining what they have access to within the project
- the project identifier
- the list of project leaders, with names and e-mails
- the project status (active or maintenance)
- the billing code
- the internal reference
Project metrics
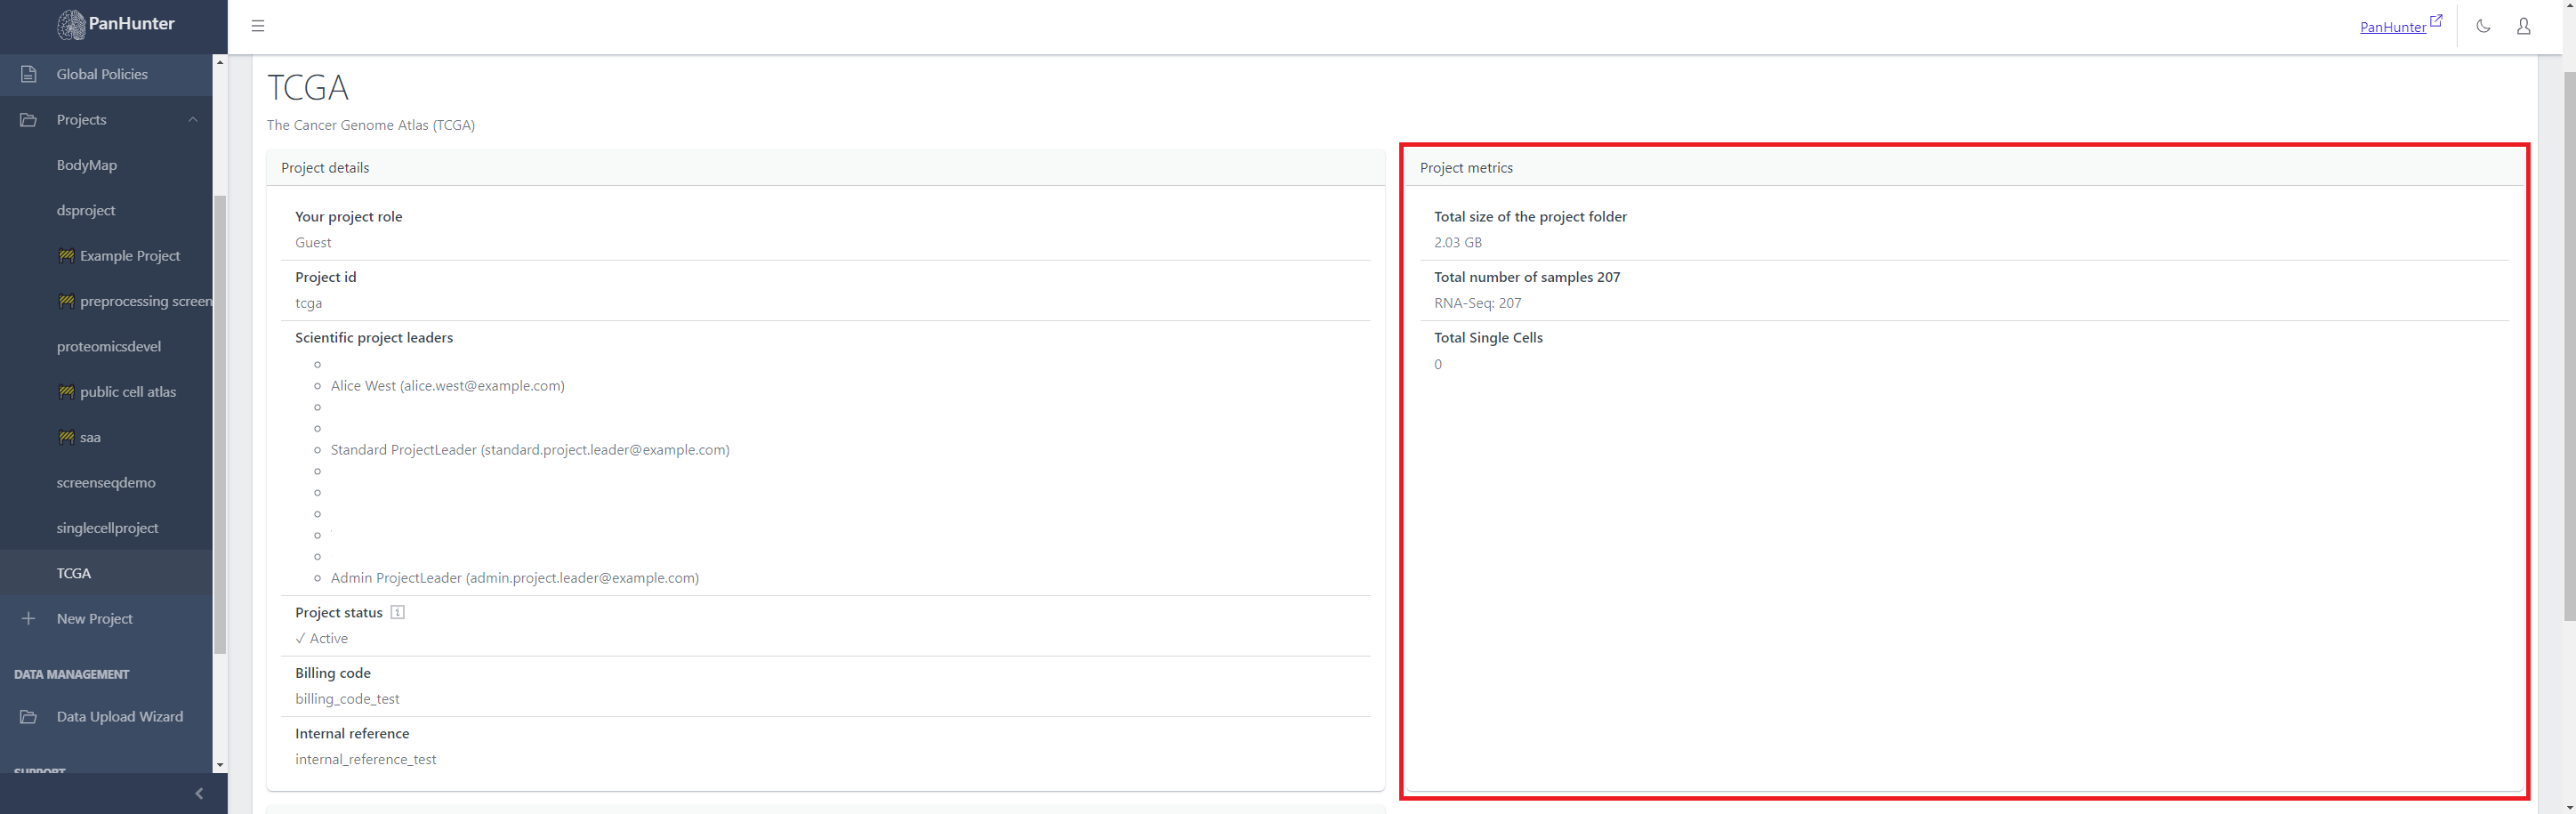
This is information obtained from the files in the project.
This information is:
- the size (in GB) taken up by the project in total
- The total number of samples, with a subsection mentioning how many samples for each protocol used in this project (RNA-Seq, Peptidomics, etc…)

- A separate section for how many Single Cell data points are within a project
3 - Data Analyst
A data analyst can run analysis and use existing data, but cannot actually insert or remove data such as sample tables or abundance data.
They are allowed to view other users in their project with their roles.
3.1 - Who's Who? Viewing Project Users
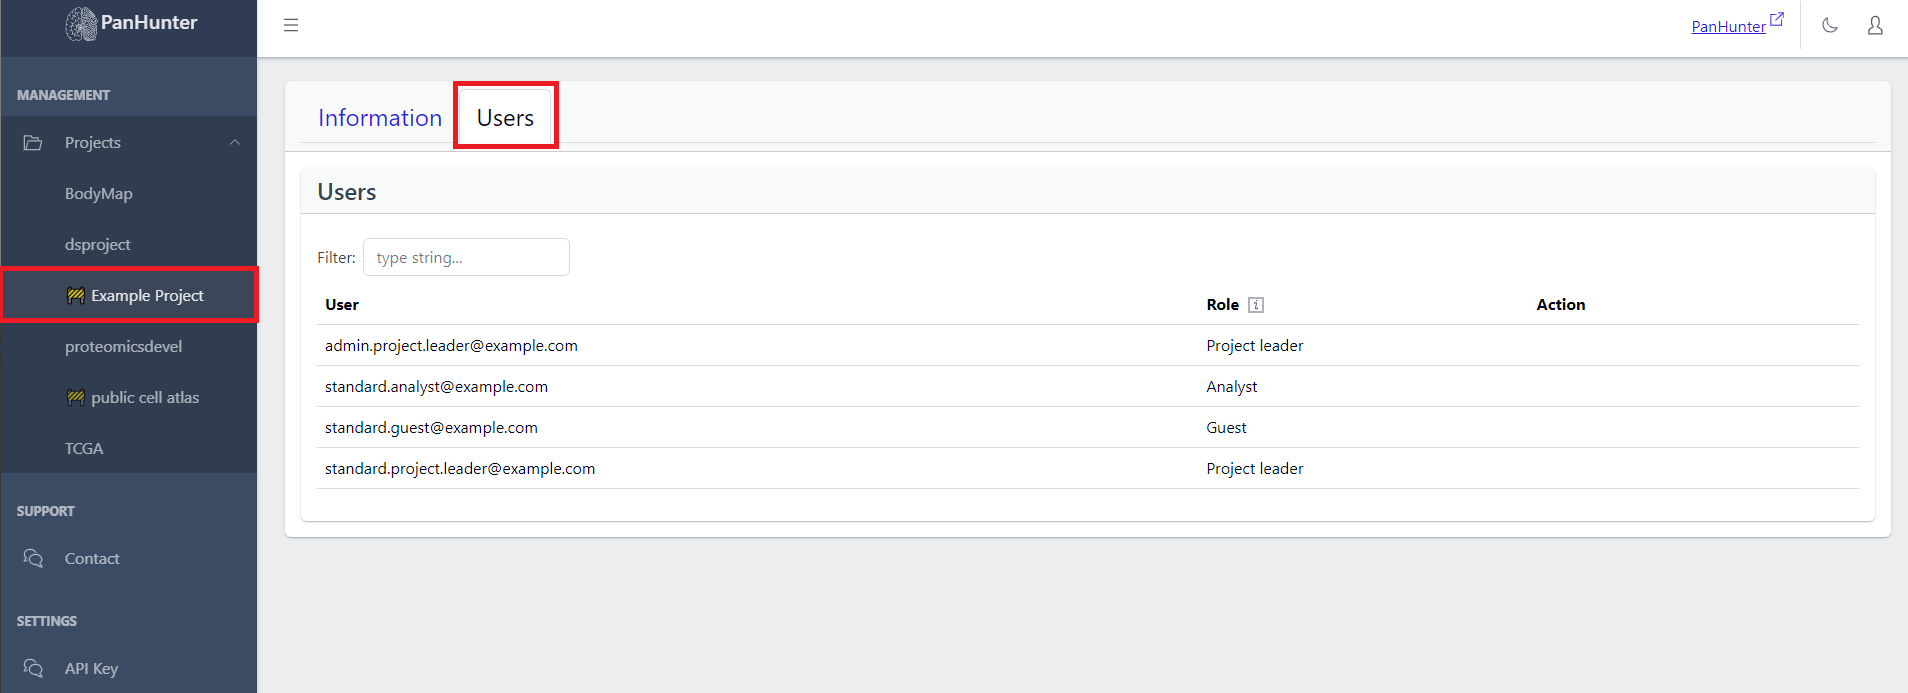
Project members except guests can see all the members of a project, along with their role, by selecting a project in the sidebar, and then going to the users tab.
4 - Project Leader
A project leader can manage users ,manage apps, manage policies in a project, and even delete a project.
4.1 - Project-specific and Prototype Apps
Info
Functionality described here requires a project leader role. For admins without a project leader role it is not available.
A project leader can add or remove project-specifc or prototype apps by going to the Project Apps tab within a project.
Project-specific apps are apps that were developed within the context of a specific project and usually contain intellectual property or specific functionallity that is only relevant for this specific project and - in some cases - must not be shared with other projects. These apps can only be used by their specific projects.
Prototype apps are apps that are still under development and thus haven’t been interrogated by QA or other means of more thorough review. However, in some cases it might already be beneficial to use those apps in the context of real projects which is why they can be added to projects on demand.
Adding Project-specific and Prototype Apps Apps
Project specific or prototype apps don’t automatically appear in the list of available apps that can be added to the app grid on the start page. Therefore, these apps need to be add to this list first before they can be added to the app grid in a second step. To add an app, click on the green + button in the top right corner. A simple form will be displayed.
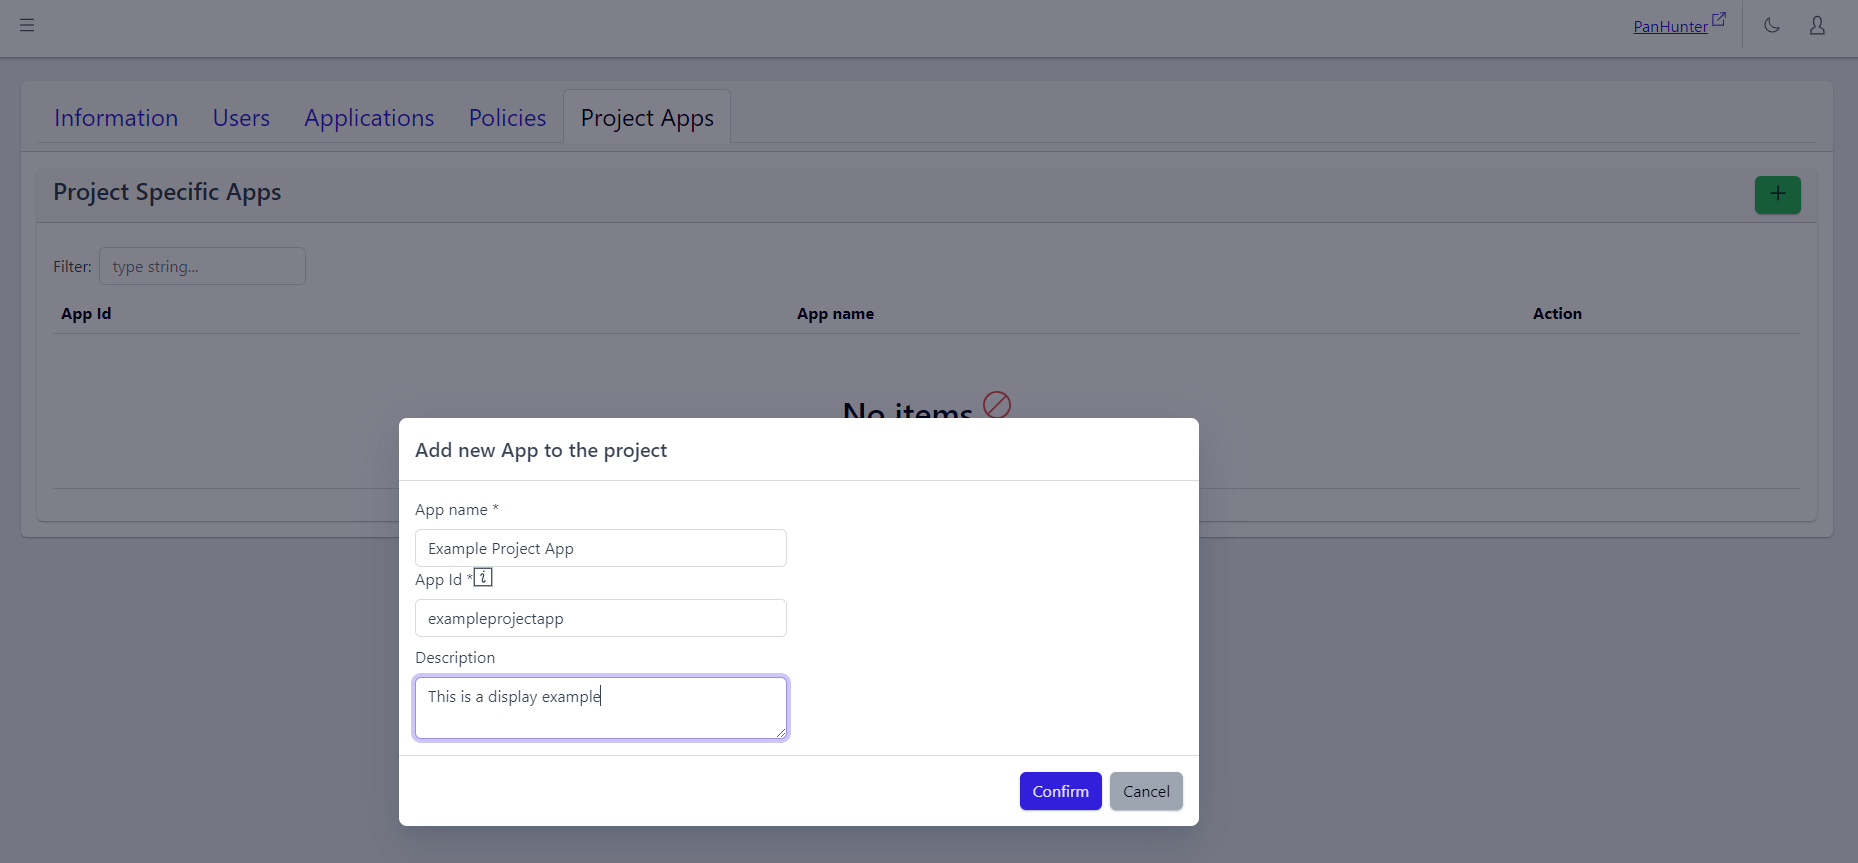
This form must be fill with the specific information for the app desired to be added: App Name, App ID (which is corresponding to the repository name), and optionally a Description.
Eventually, the newly added app needs to be added to the app grid as well, in order to be accessible from the PanHunter start page. The details are explained in the Project Apps article.
If present, the description is displayed when hovering over the app in the Start Page, and when Selecting PanHunter Apps.
Viewing And Deleting Project-specific and Prototype Apps
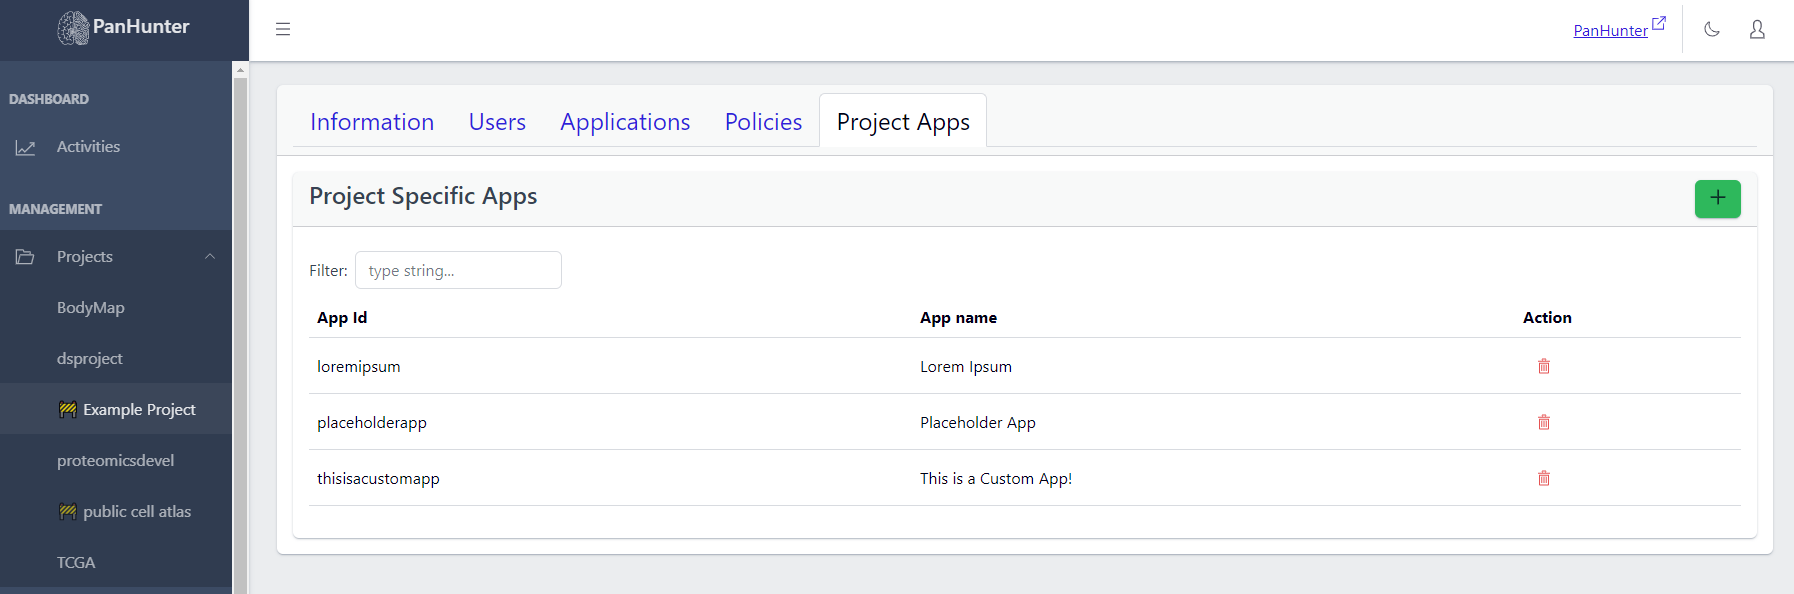
In the Project Apps tab, a list of Project-Specific Apps of this project are displayed, with App Name, App Id, and a Delete button for each app.
4.2 - Changing The Pattern: Managing the Project App Grid
Info
Functionality described here requires a project leader role. For admins without a project leader role it is not available.
A project leader can see and edit the apps on the start page of a project in the Applications tab of that project.
Viewing Apps Within A Project
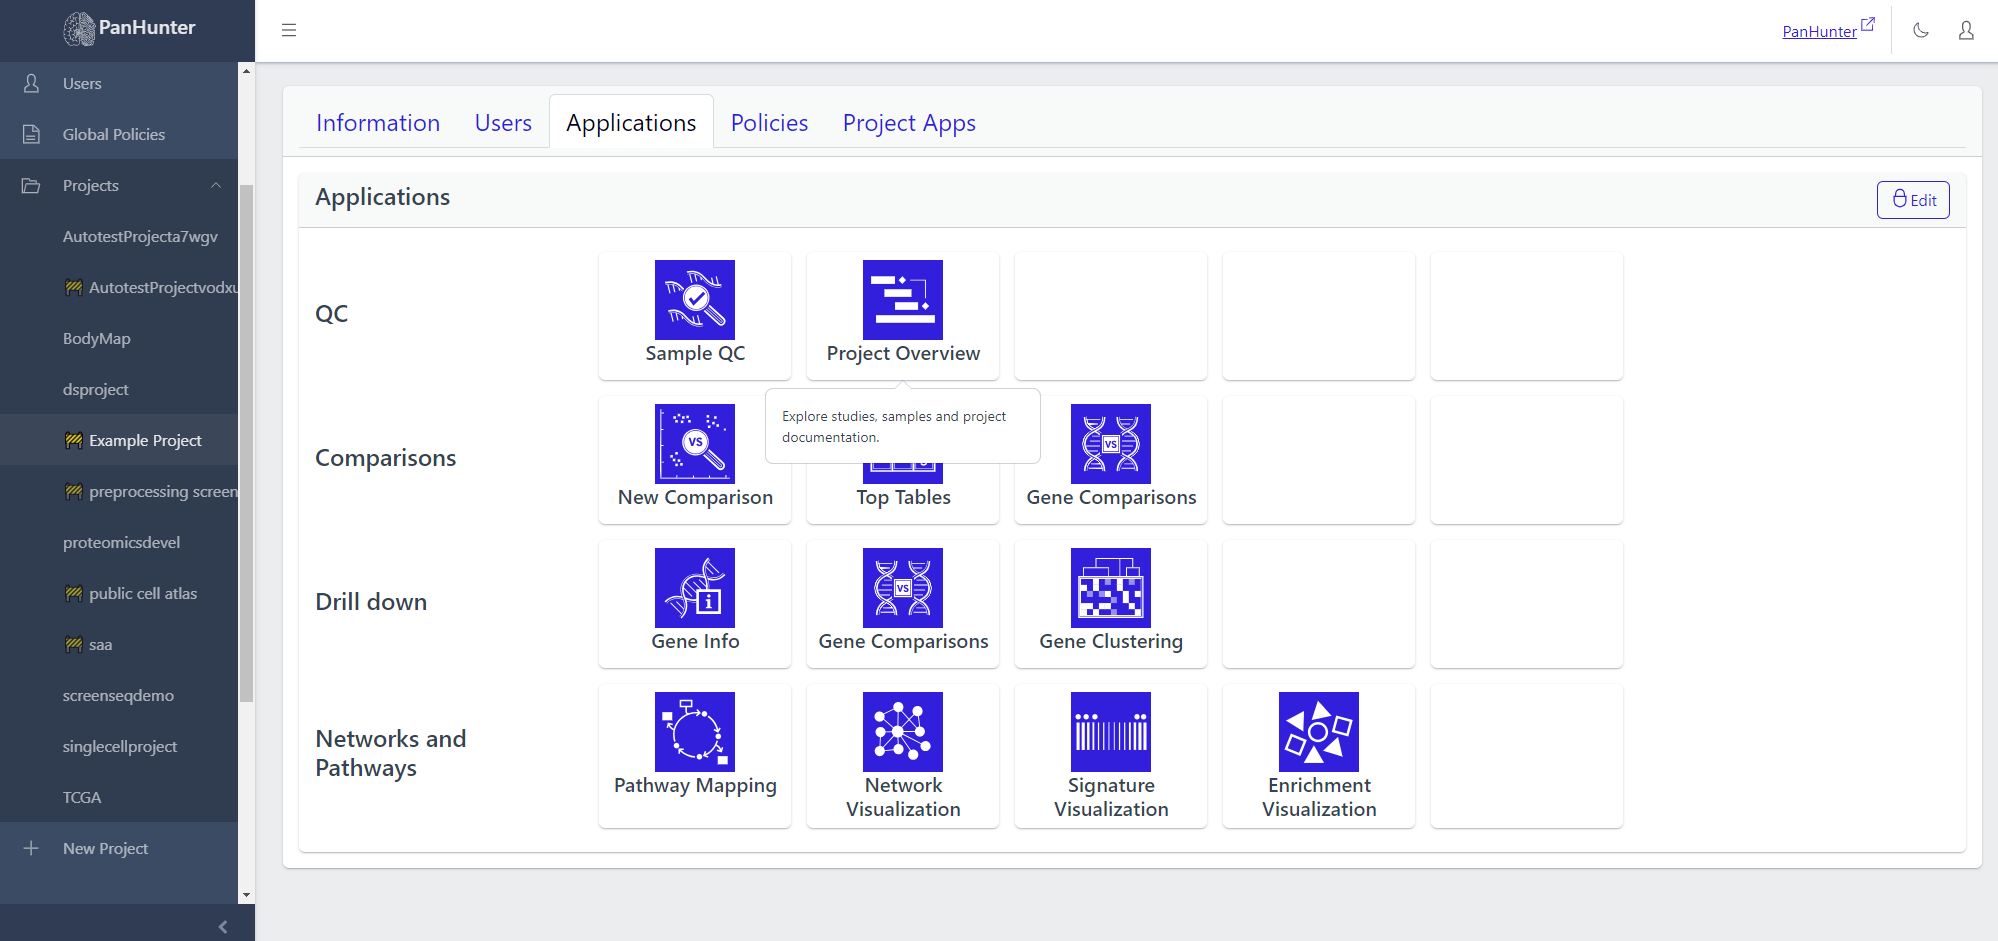
Going to Project > Applications shows which apps will be displayed on this project’s start page.
Hovering the cursor over one of the app icons displays the app description.
Changing Apps In A Project
Clicking Edit in the top right corner allows to modify the start page content. Here the apps can be moved around to arrange the apps of the project start page differently.
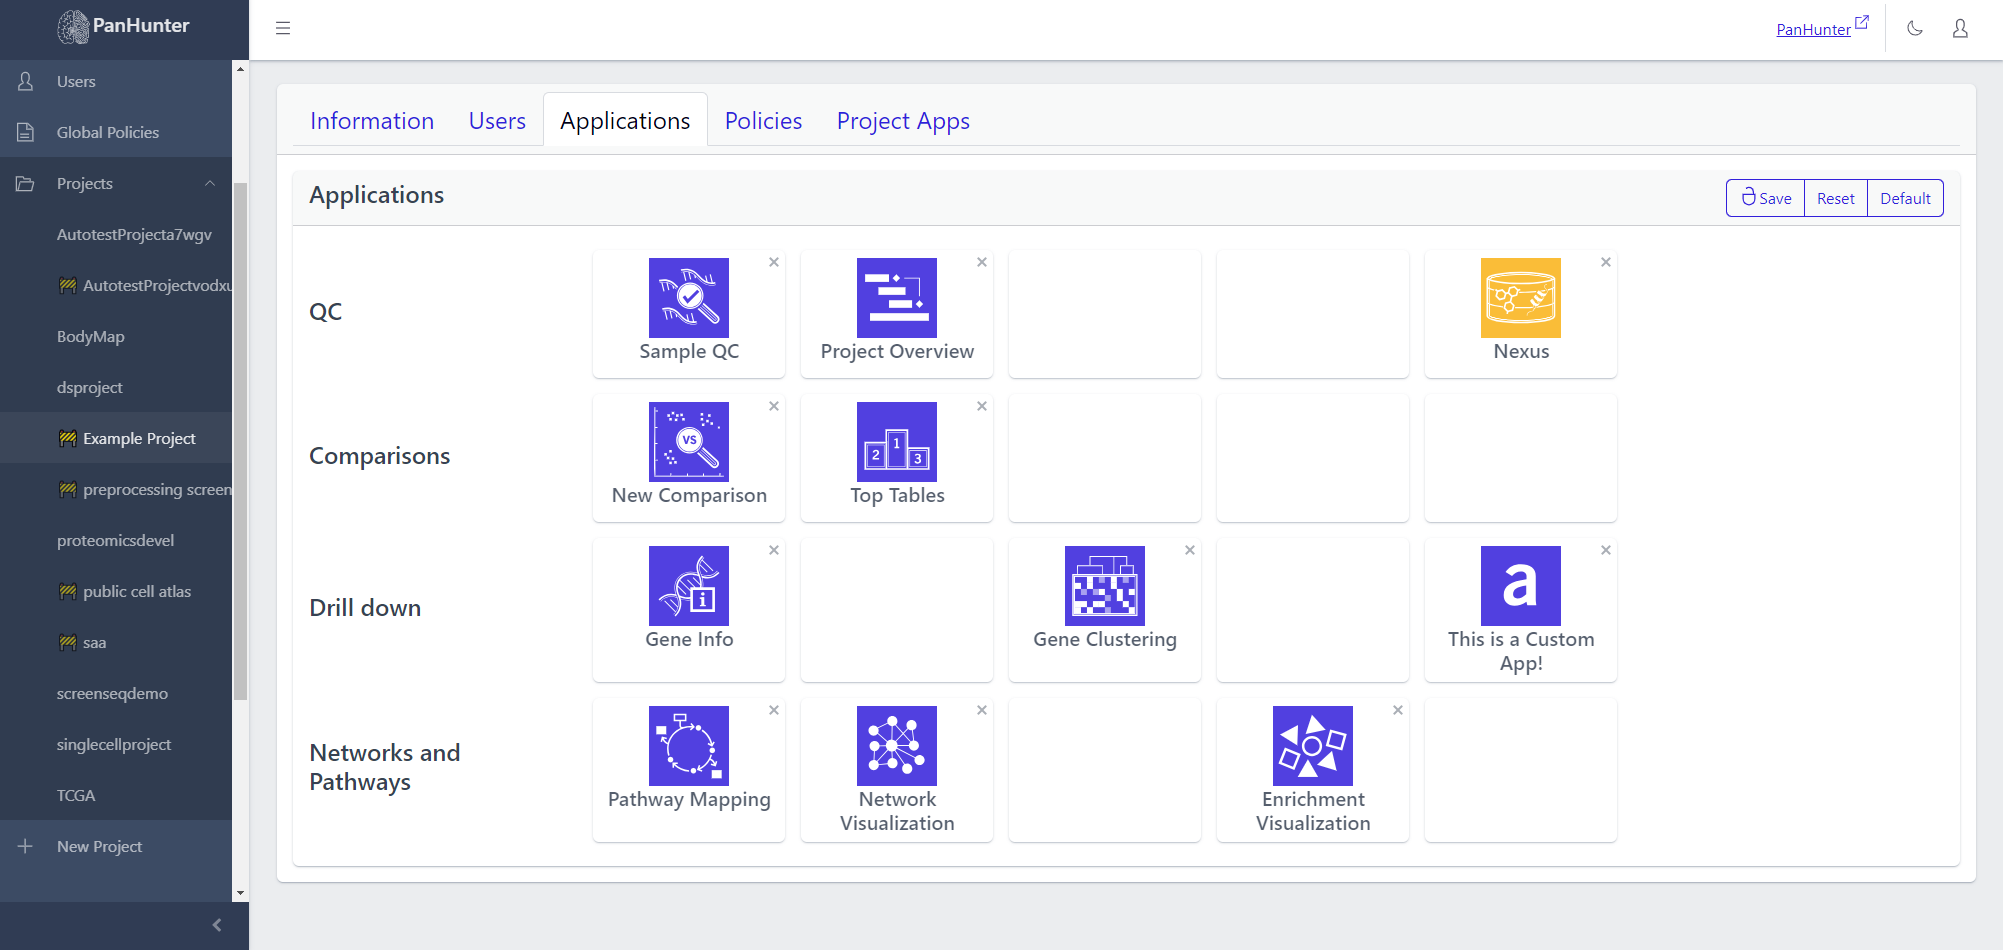
Clicking on x next to an app allows its removal.
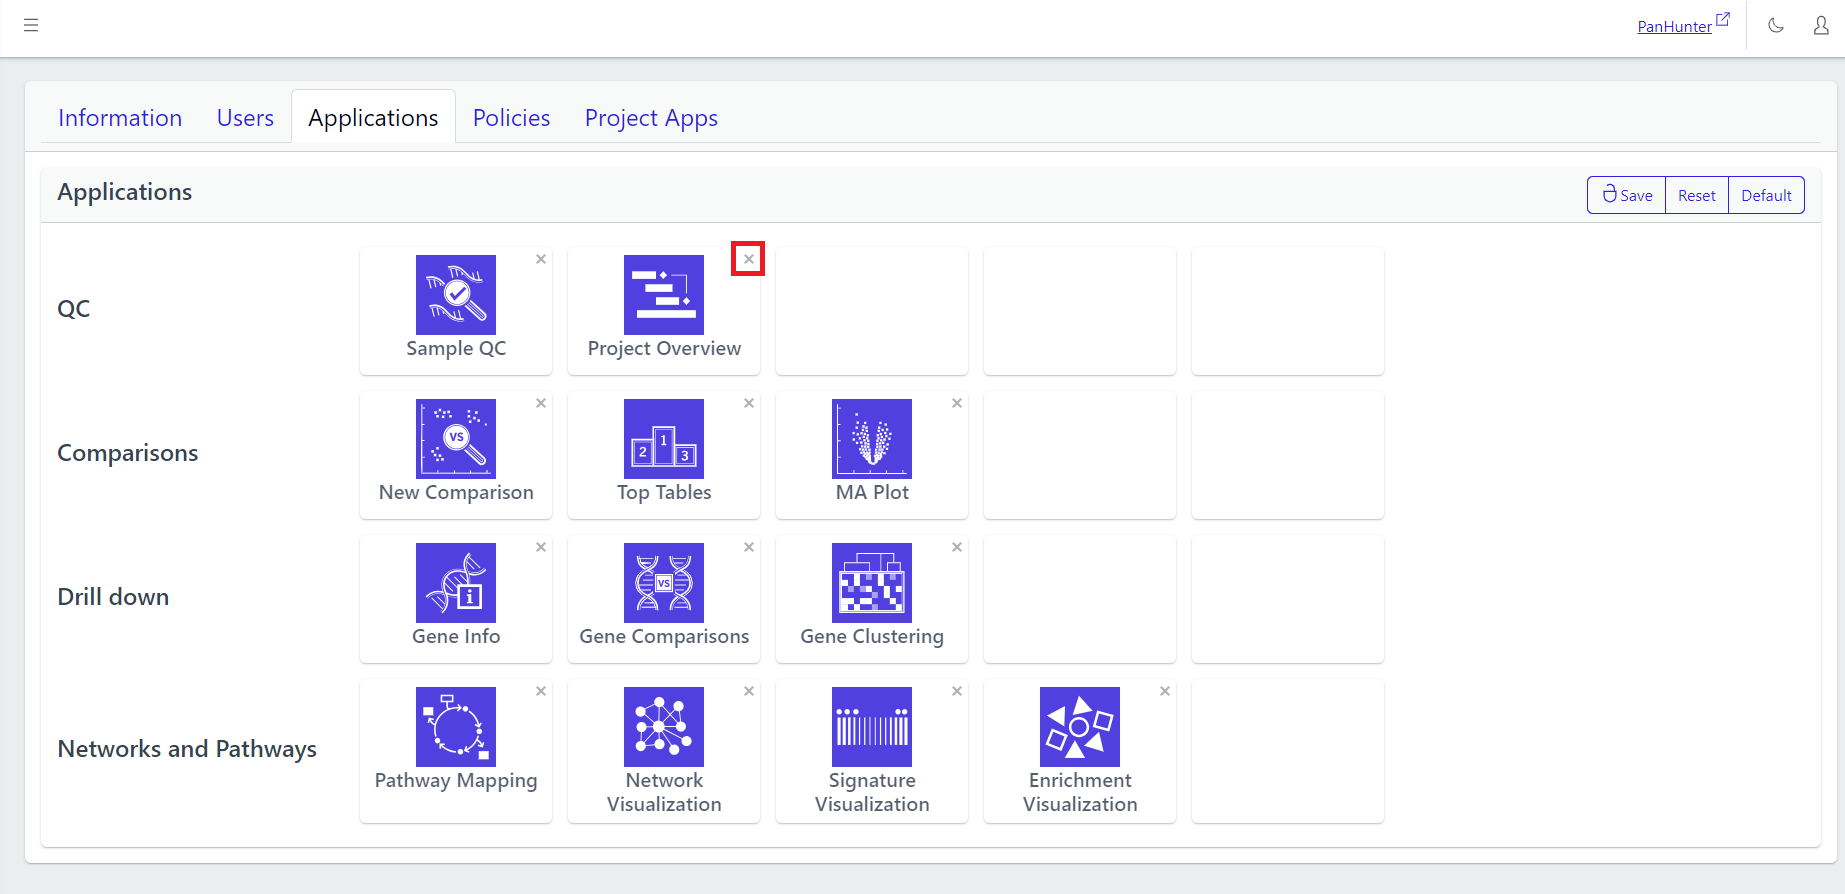
Clicking on one of the squares in the grid, whether empty or not, brings up an App selection menu. Hovering over one of these apps displays the corresponding description. This menu contains both the core apps available to all projects, but also previously added project-specific and prototype apps. Also see the article about project-specific and prototype apps.
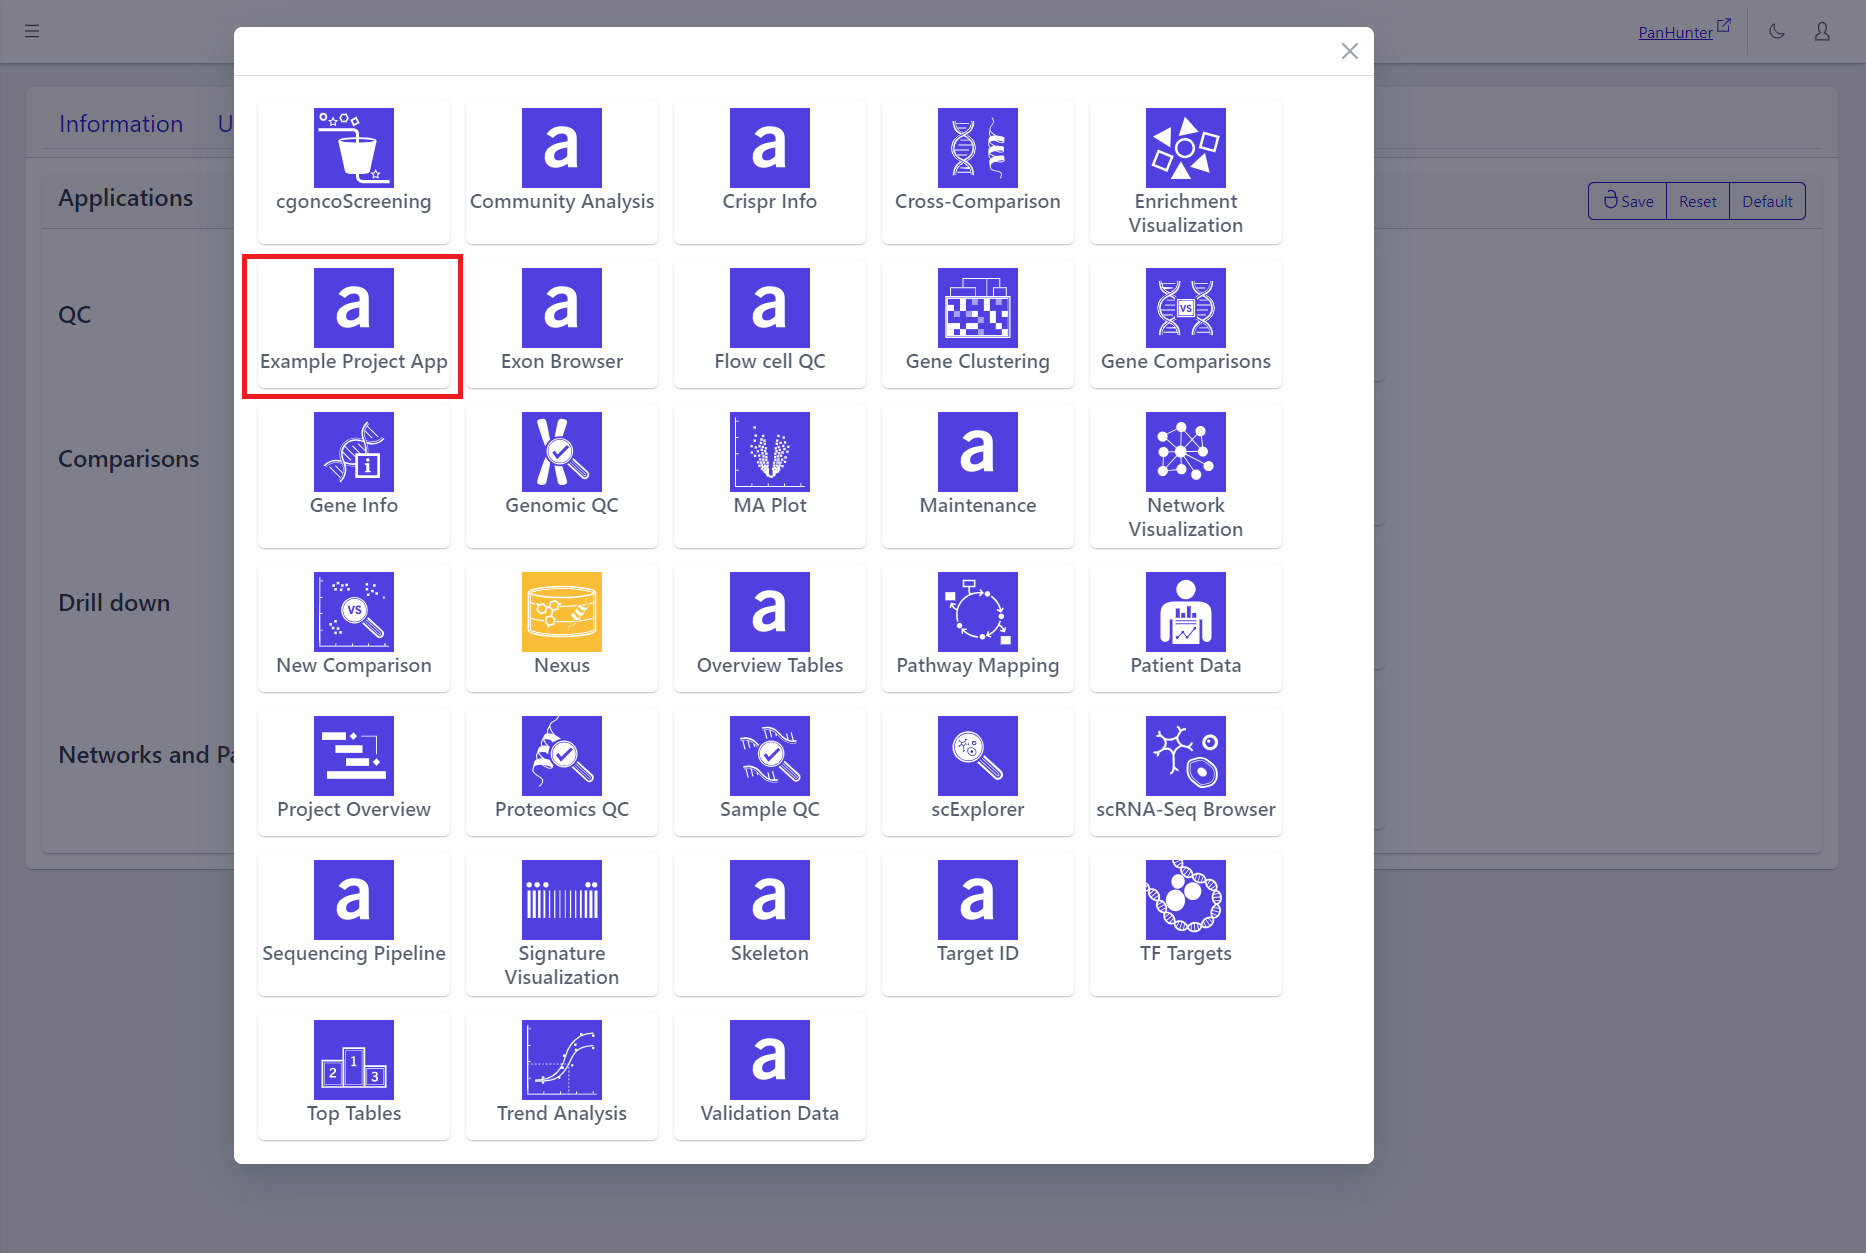
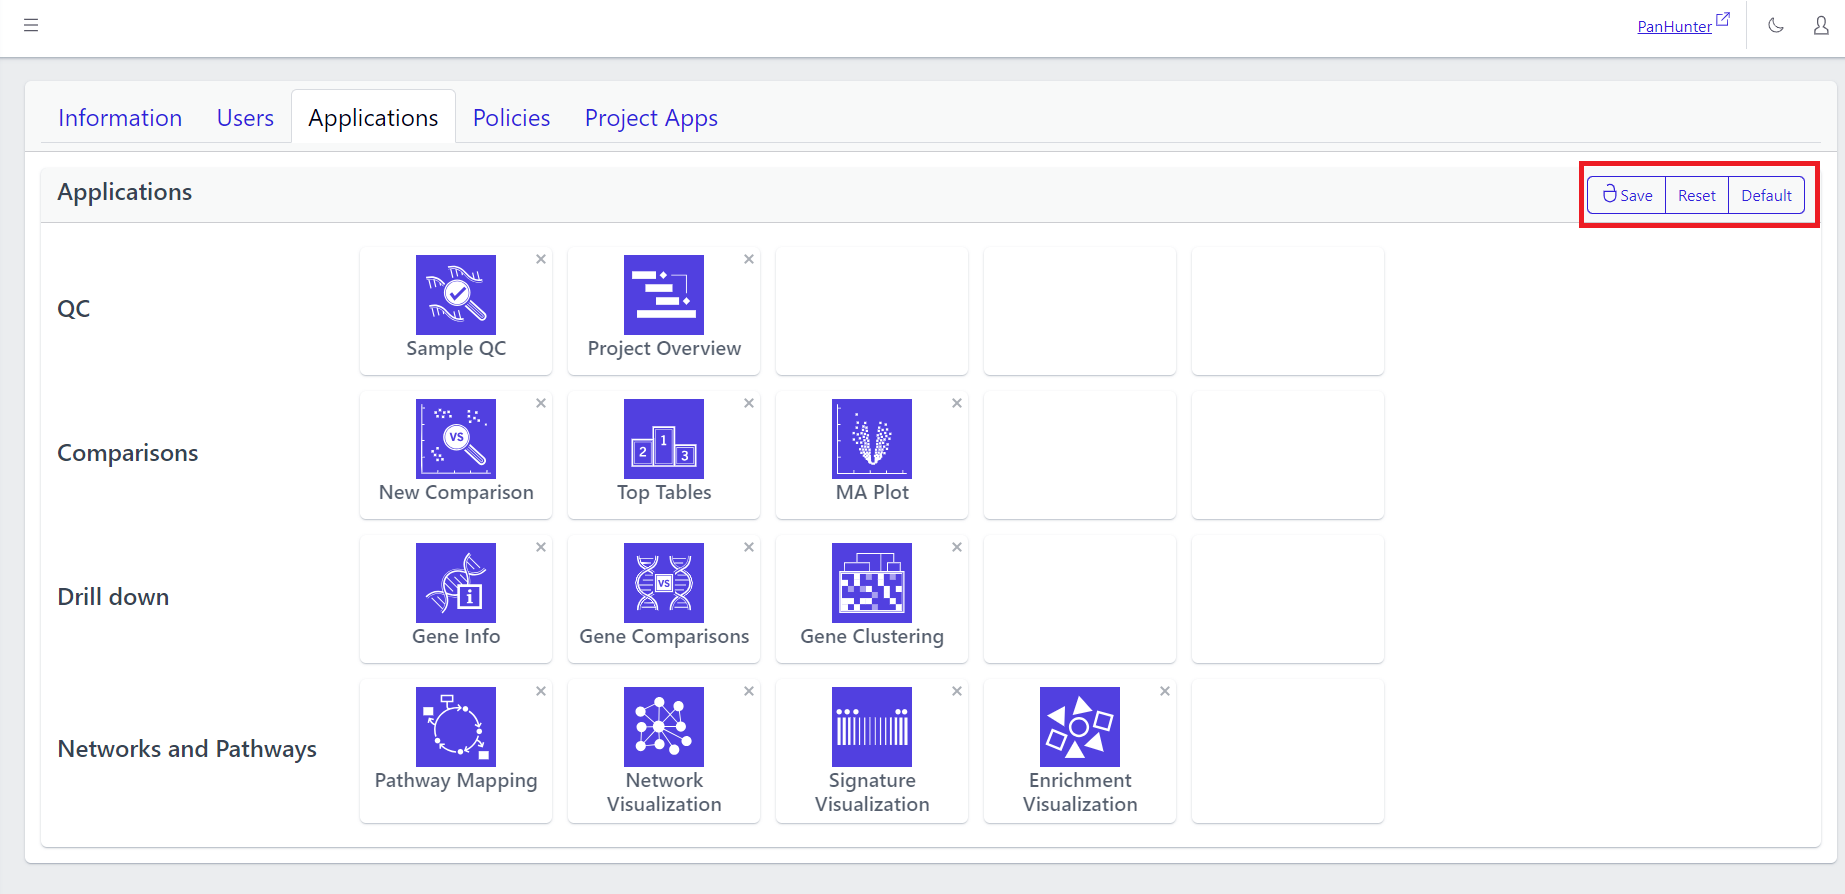
In the grid:
- Clicking Save lets a user save the current changes.
- Clicking Reset returns the grid to its state when the Edit button was last clicked.
- Clicking Default replaces the current grid with a base application grid corresponding to the basic PanHunter setup:
- the PanHunter apps common to most projects are present in the grid.
- less frequently used apps, such as those involving Single Cell Data, or Patient Data, are not present in the grid.
4.3 - Data Management: Control Your Data Flow
Info
Data management is available for users with
Data manager and
Project lead roles. The full documentation on data management is available under
Data Manager role in
Admin App.
4.4 - Extra Details: Editing Project Information
Info
Functionality described here requires a project leader role. For admins without a project leader role it is not available.
A project leader can edit the project information on the project information page. The fields that can be modified become editable by clicking the pencil symbol next to the corresponding field text.
A project leader can edit the project name, description, status (active or maintenance), billing code, and the internal reference.
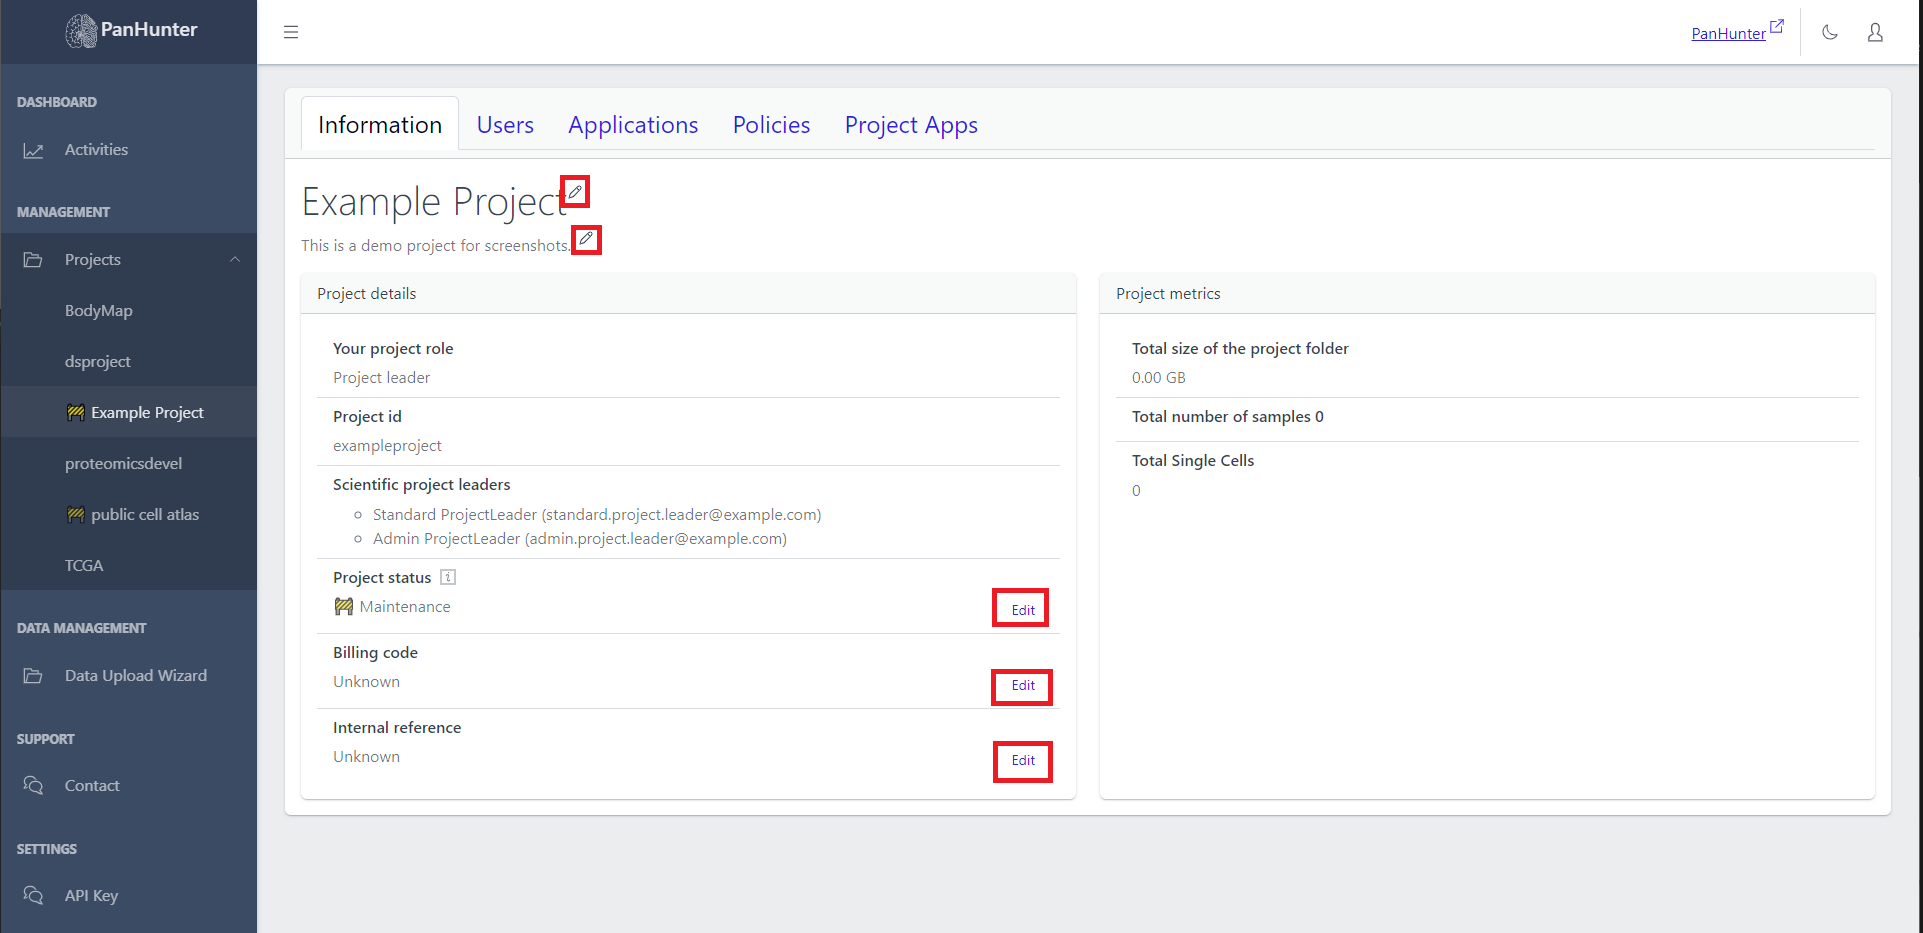

The information tab consists of the details, metrics, and configuration of your project. As the first step, you can fill in the title of your project and a modified description by clicking on the pencil icon.

Project details
Here, you can fill in all the basic informations regarding your project:
- Your project role e.g., Project leader or Assistant
- Project id for easy search and identification
- Scientific project leaders involved in this project
- Project status indicating whether “Active” or in “Maintainance”
- Billing code for your records
- Internal reference for adding a reference to your project, e.g. an EVT number
- Gitlab URL link to the associated GitLab repository to automatically sync access rights
- Metadata Package Version providing version information for metadata packages

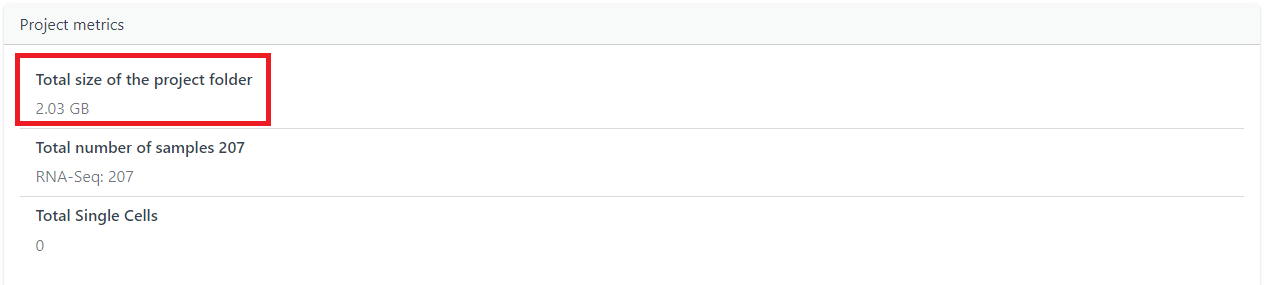
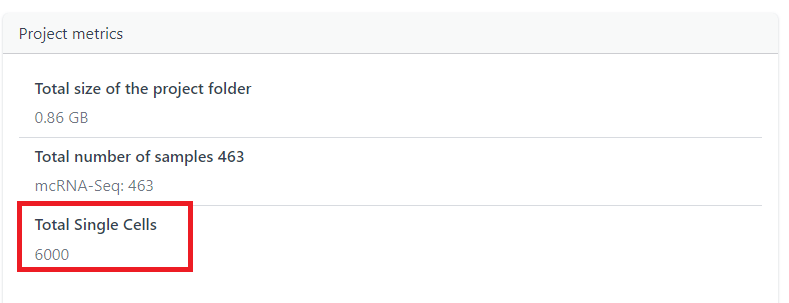
Project metrics
This tab gives you the metrics data about your project such as:
- Total size of the project folder
- Total number of samples along with its type
- Total Single Cells present in your project

Project configuration
Here, you get the option to delete your whole project. Use this with caution! You must enter your project name here and press the delete button highlighted below after following the mentioned points in the example picture.
Remember: A project, once deleted, cannot be recovered

4.5 - The Big Picture: Viewing Project Activities
On the Activities page, a project leader gets access to usage information on the projects they lead.
Choosing A Time Interval
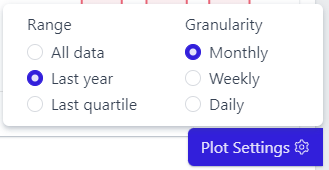
Clicking Plot Settings in the bottom right corner reveals a menu governing all graphs on the page, allowing to choose the time period covered and the granularity of the interval displayed.
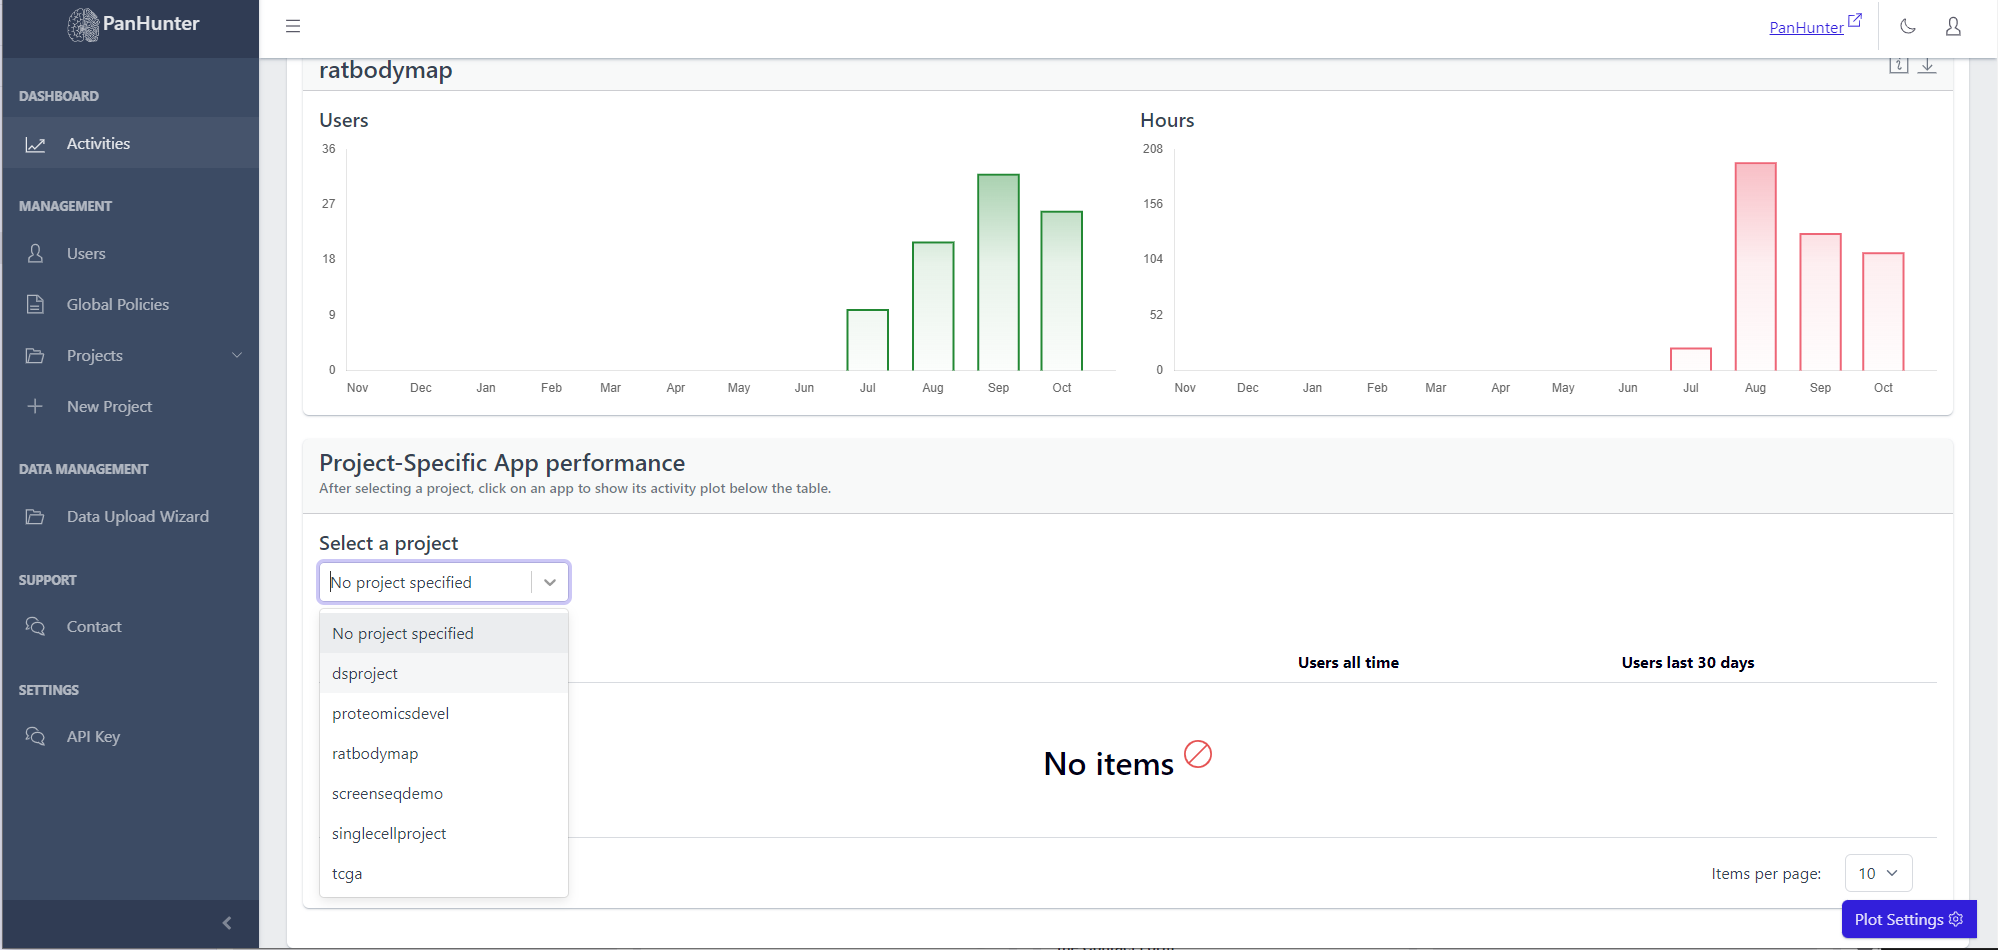
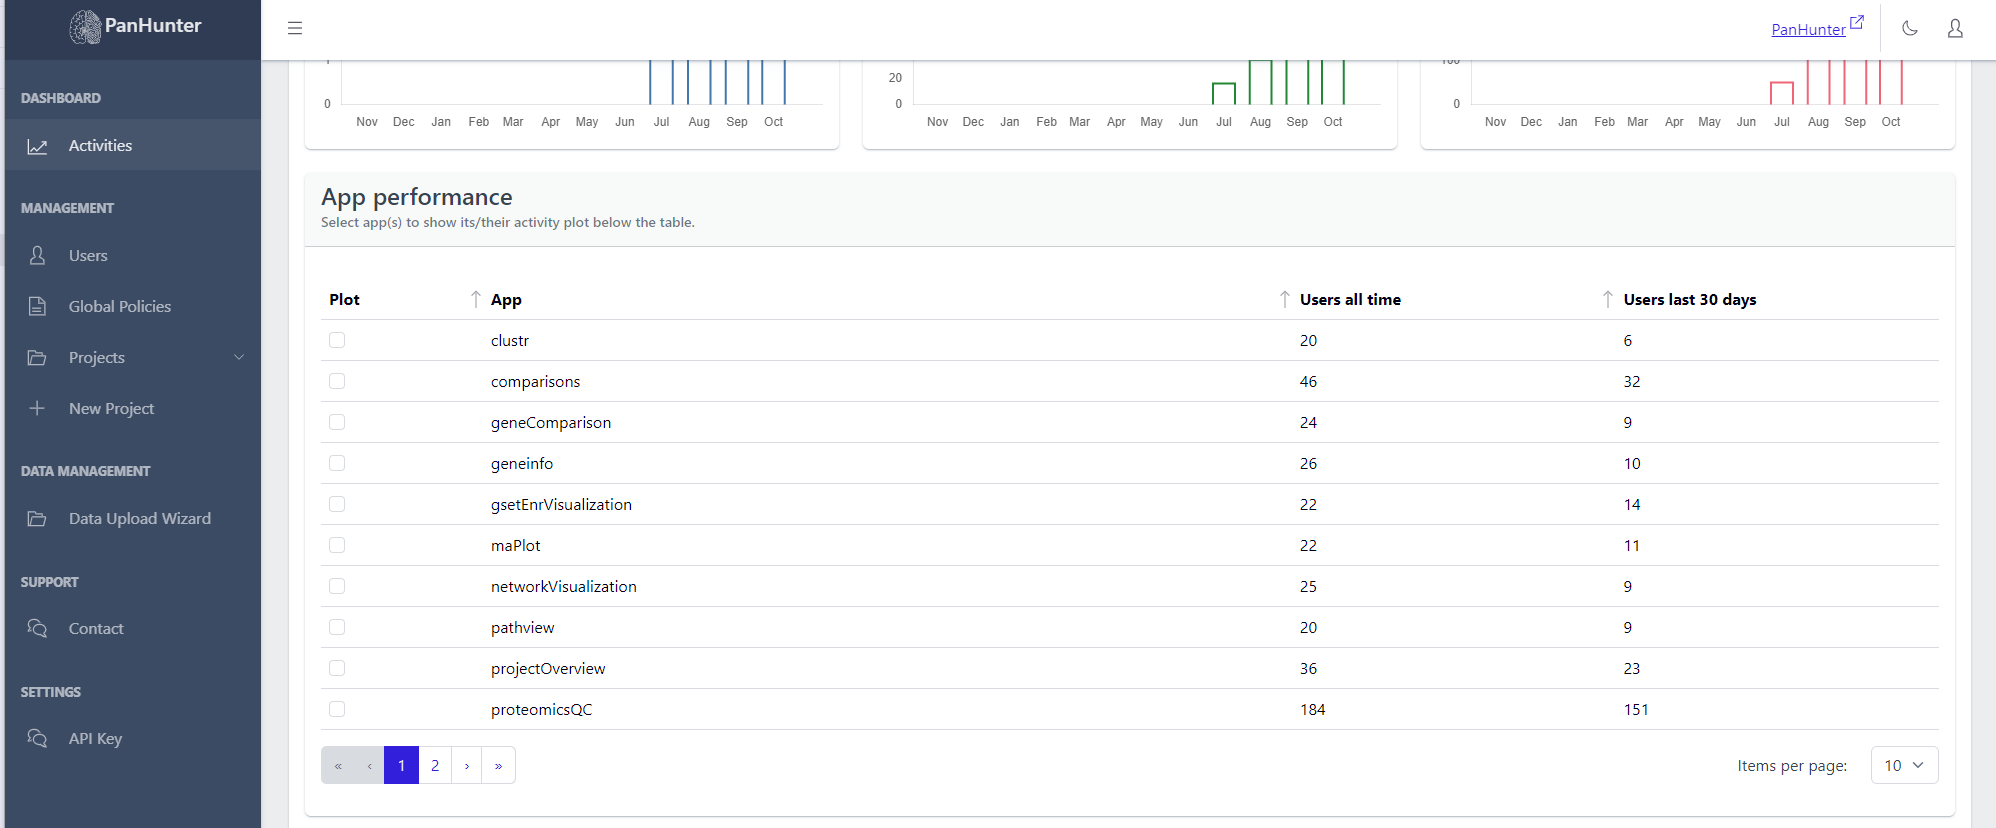
To access this, go to Activities in the sidebar,and go to the Projects tab and scroll down.
Displayed is a table with the names of the projects, the number of users who ever accessed this project, and the number of users who accessed this project in the last 30 days.
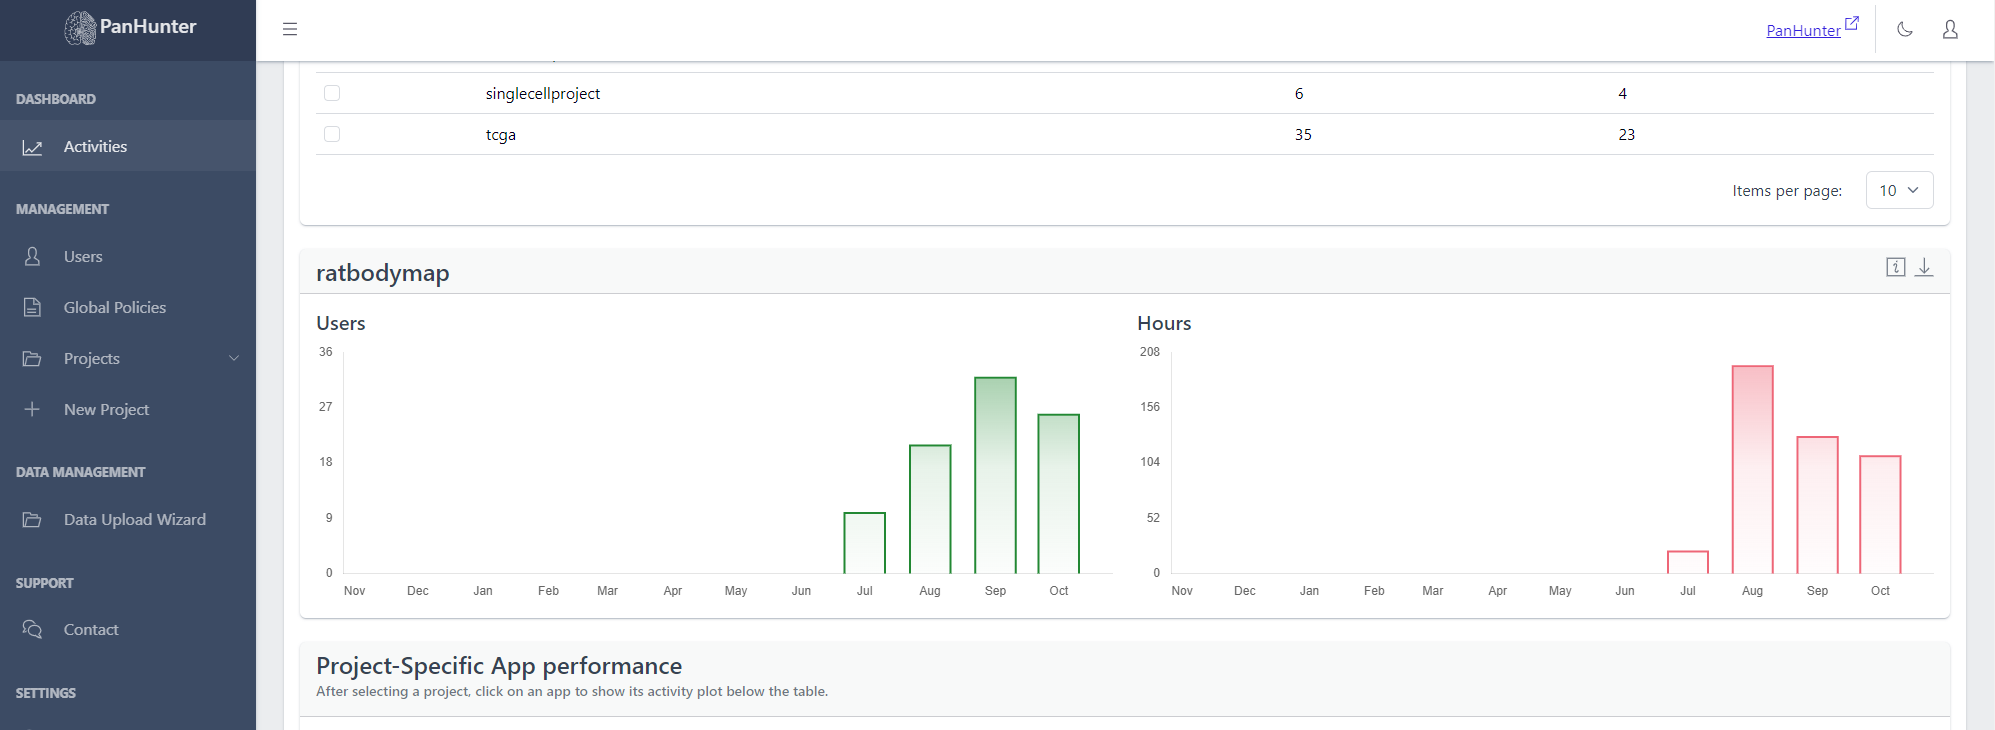
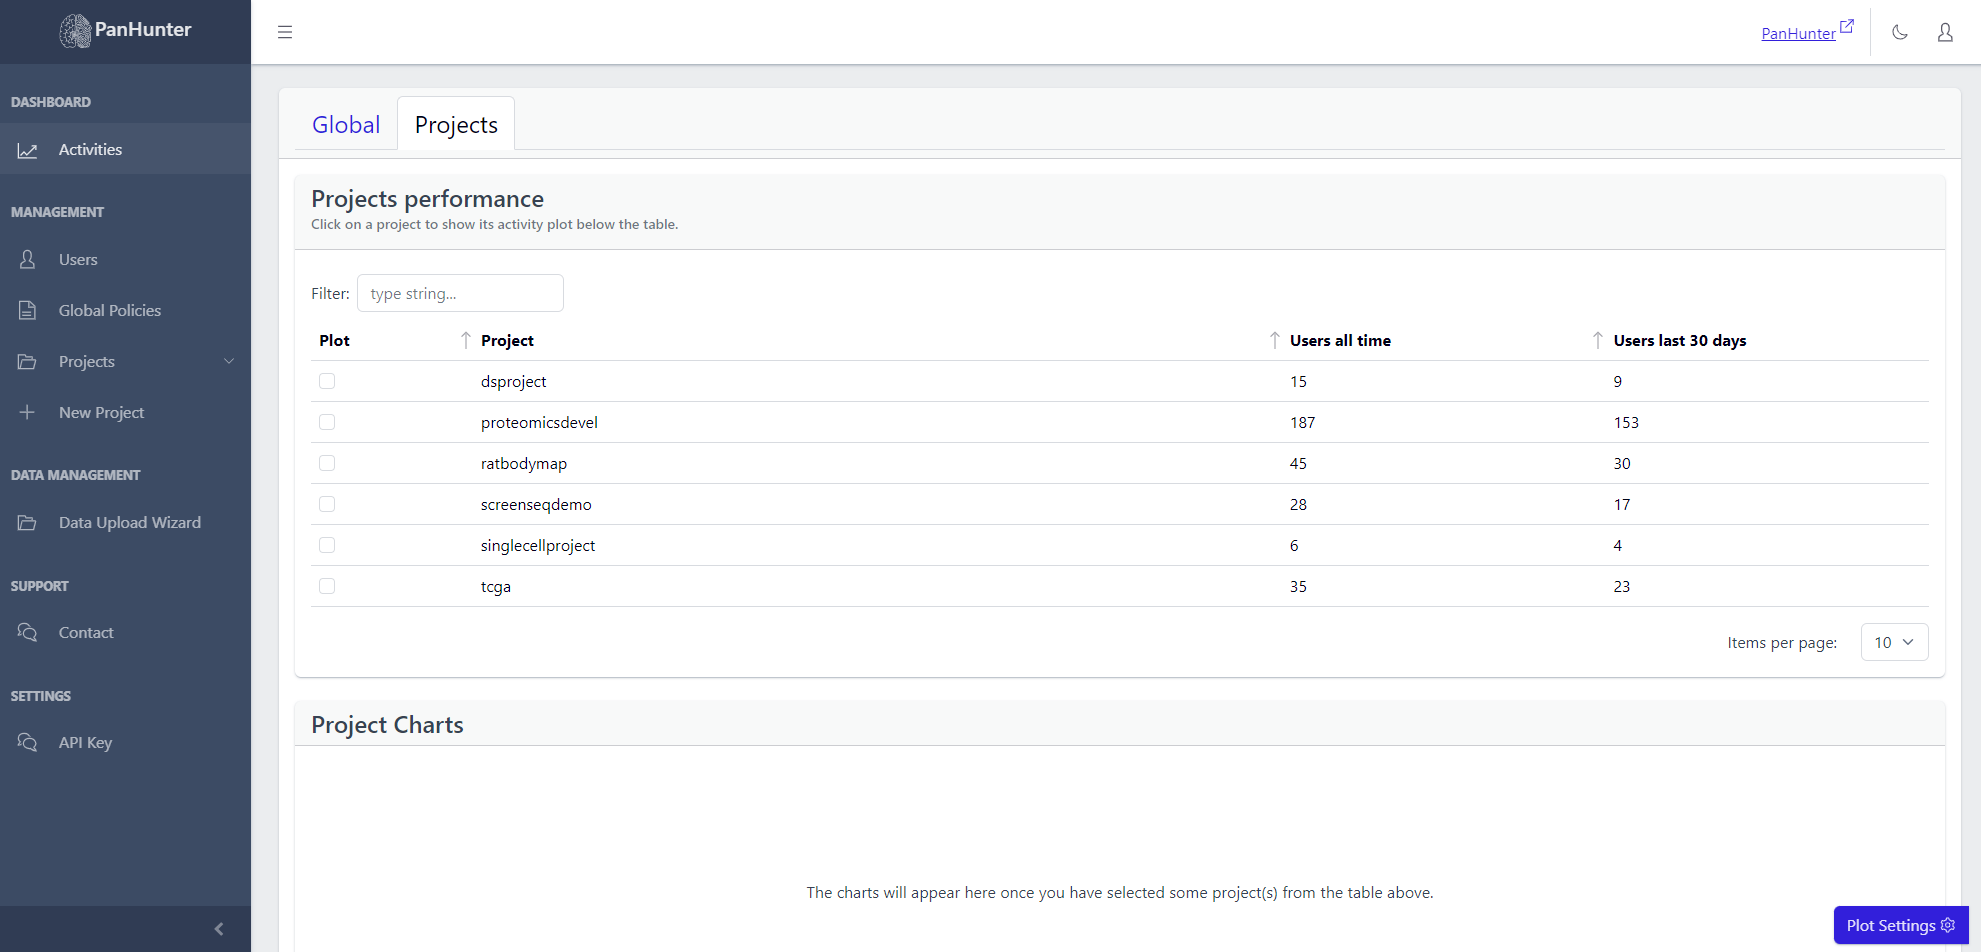 Selecting a row displays additional plots with the number of active users, and number of active hours, for this project.
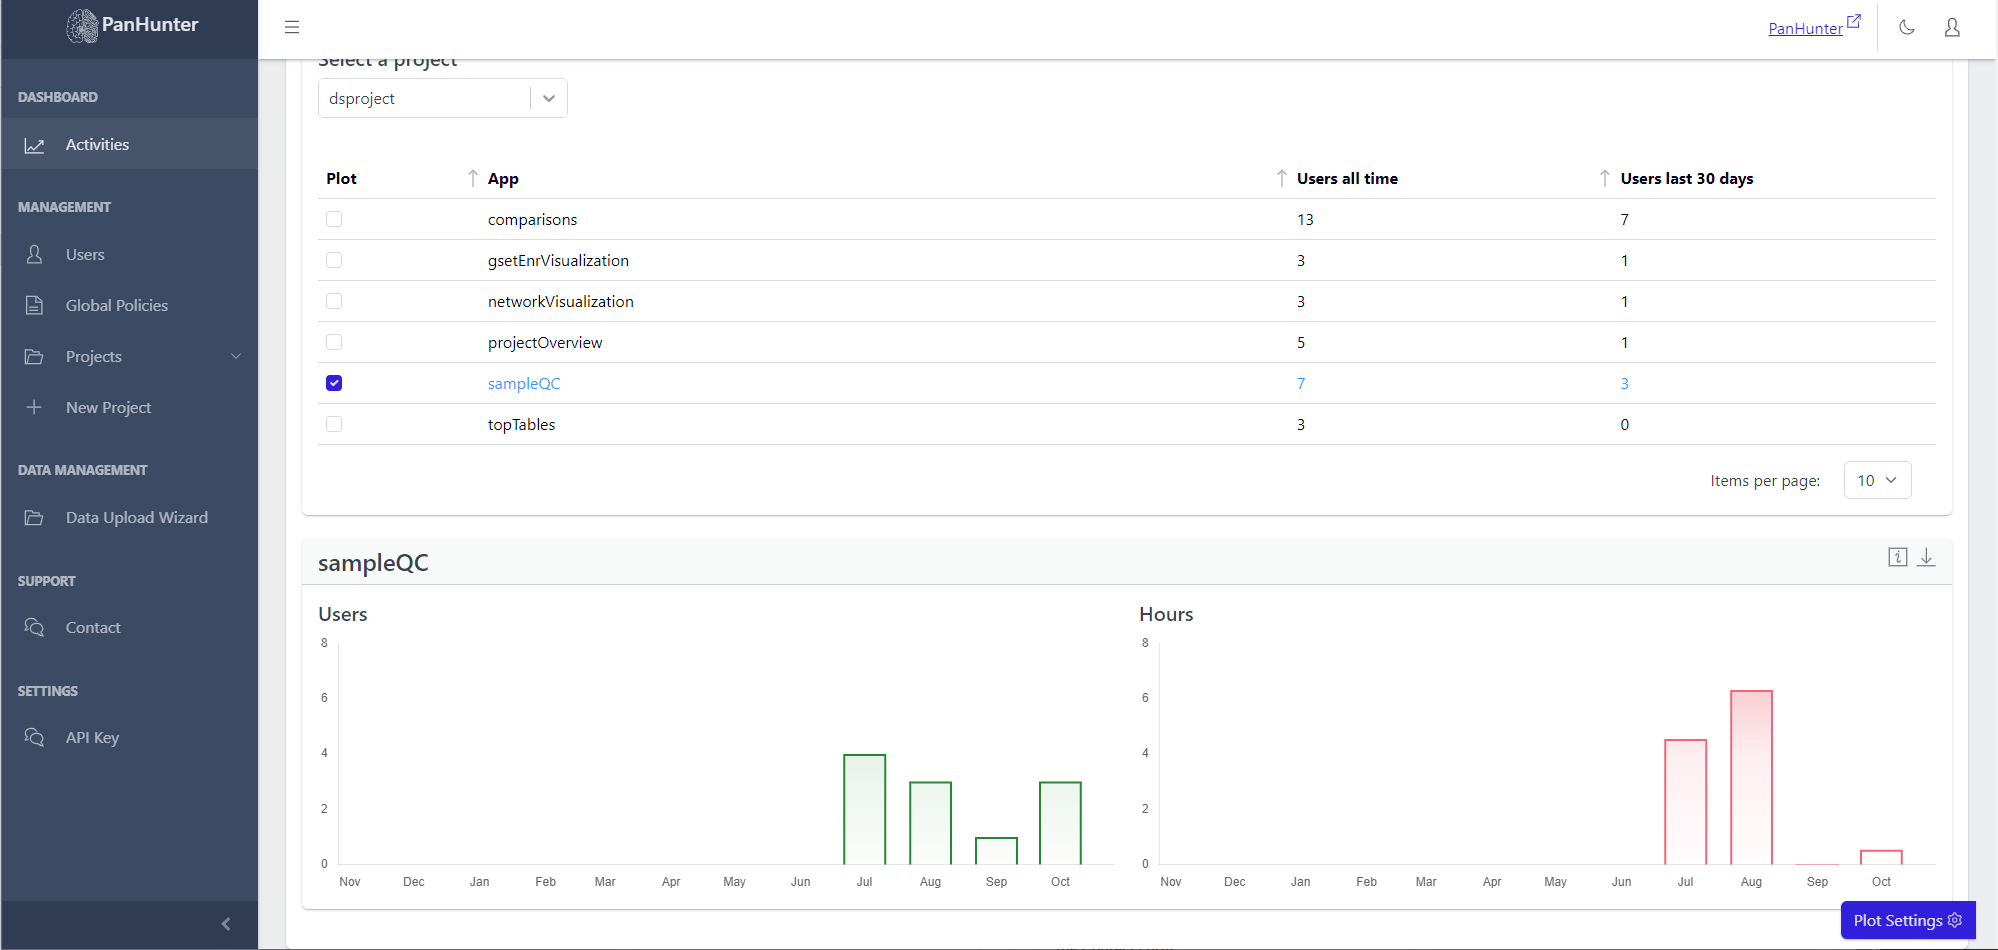
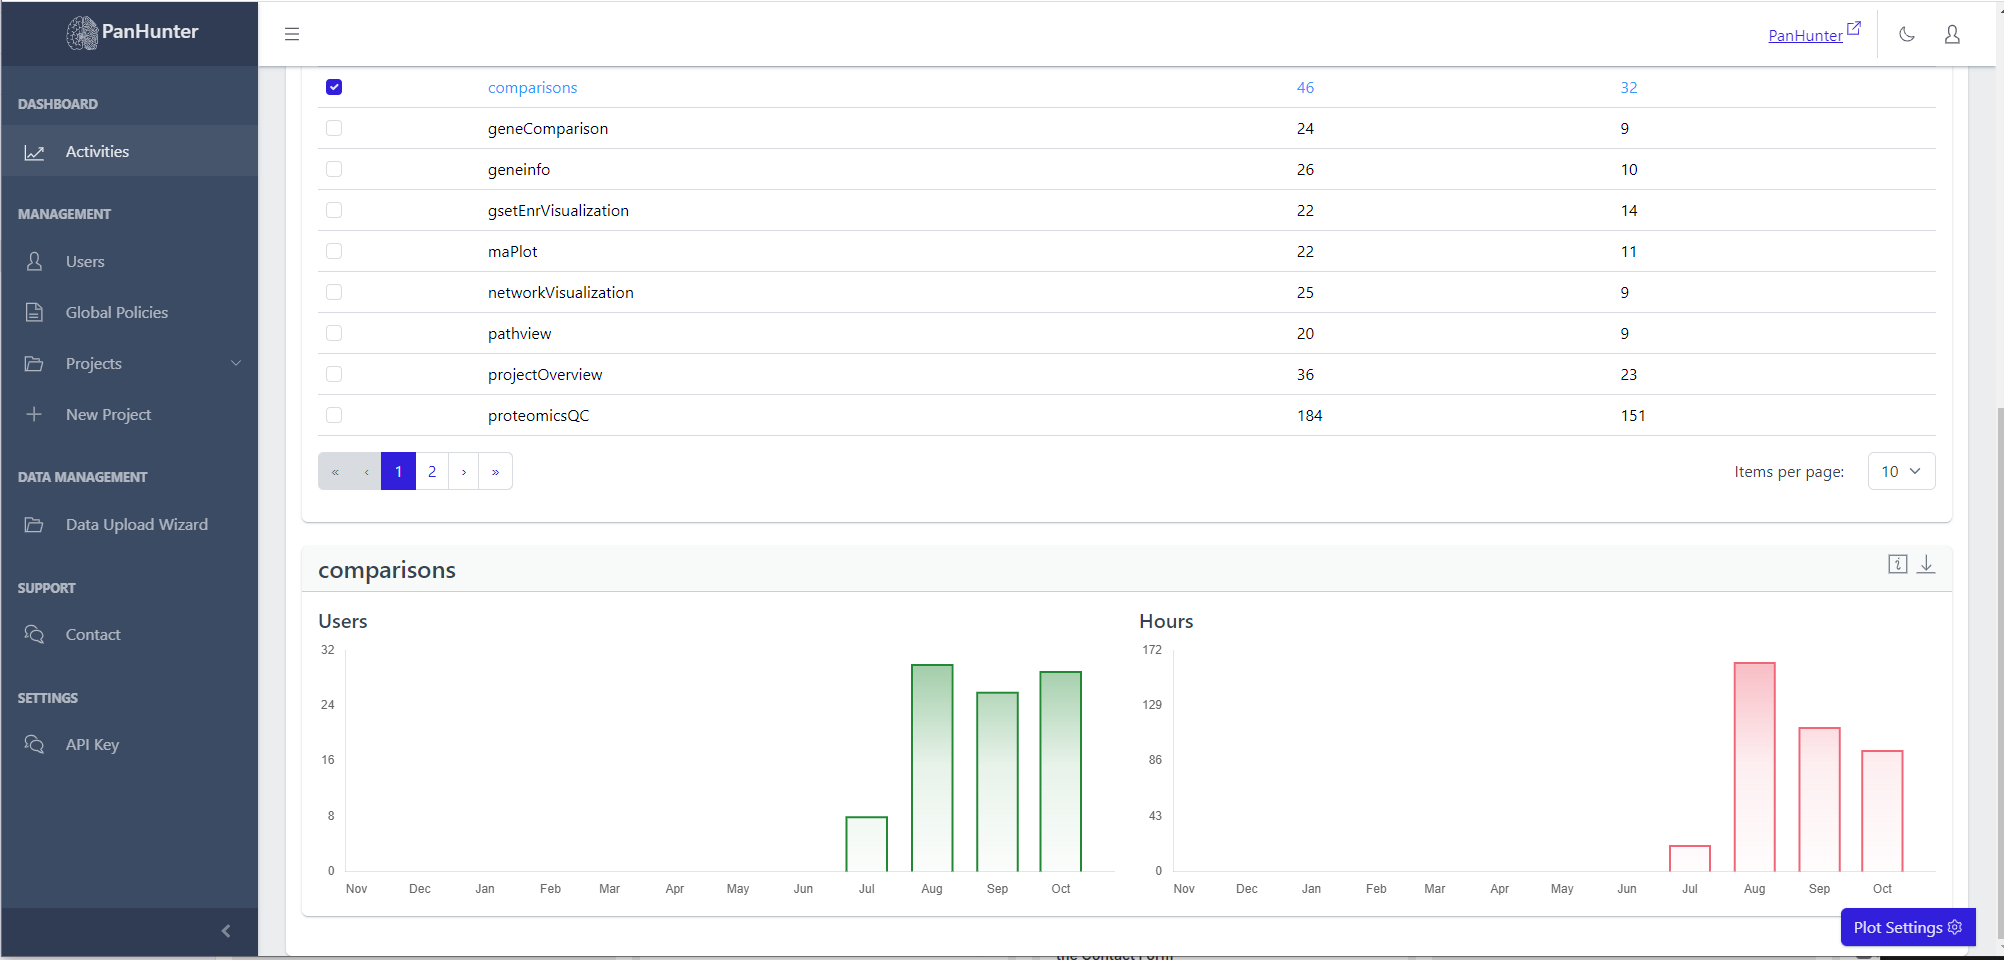
To access this, go to Activities in the sidebar, go to the Projects tab and scroll down. Then, select the desired project from the Select a Project dropdown list.
 Displayed is a table with the names of the apps, the number of users who ever accessed this app, and the number of users who accessed this app in the last 30 days.
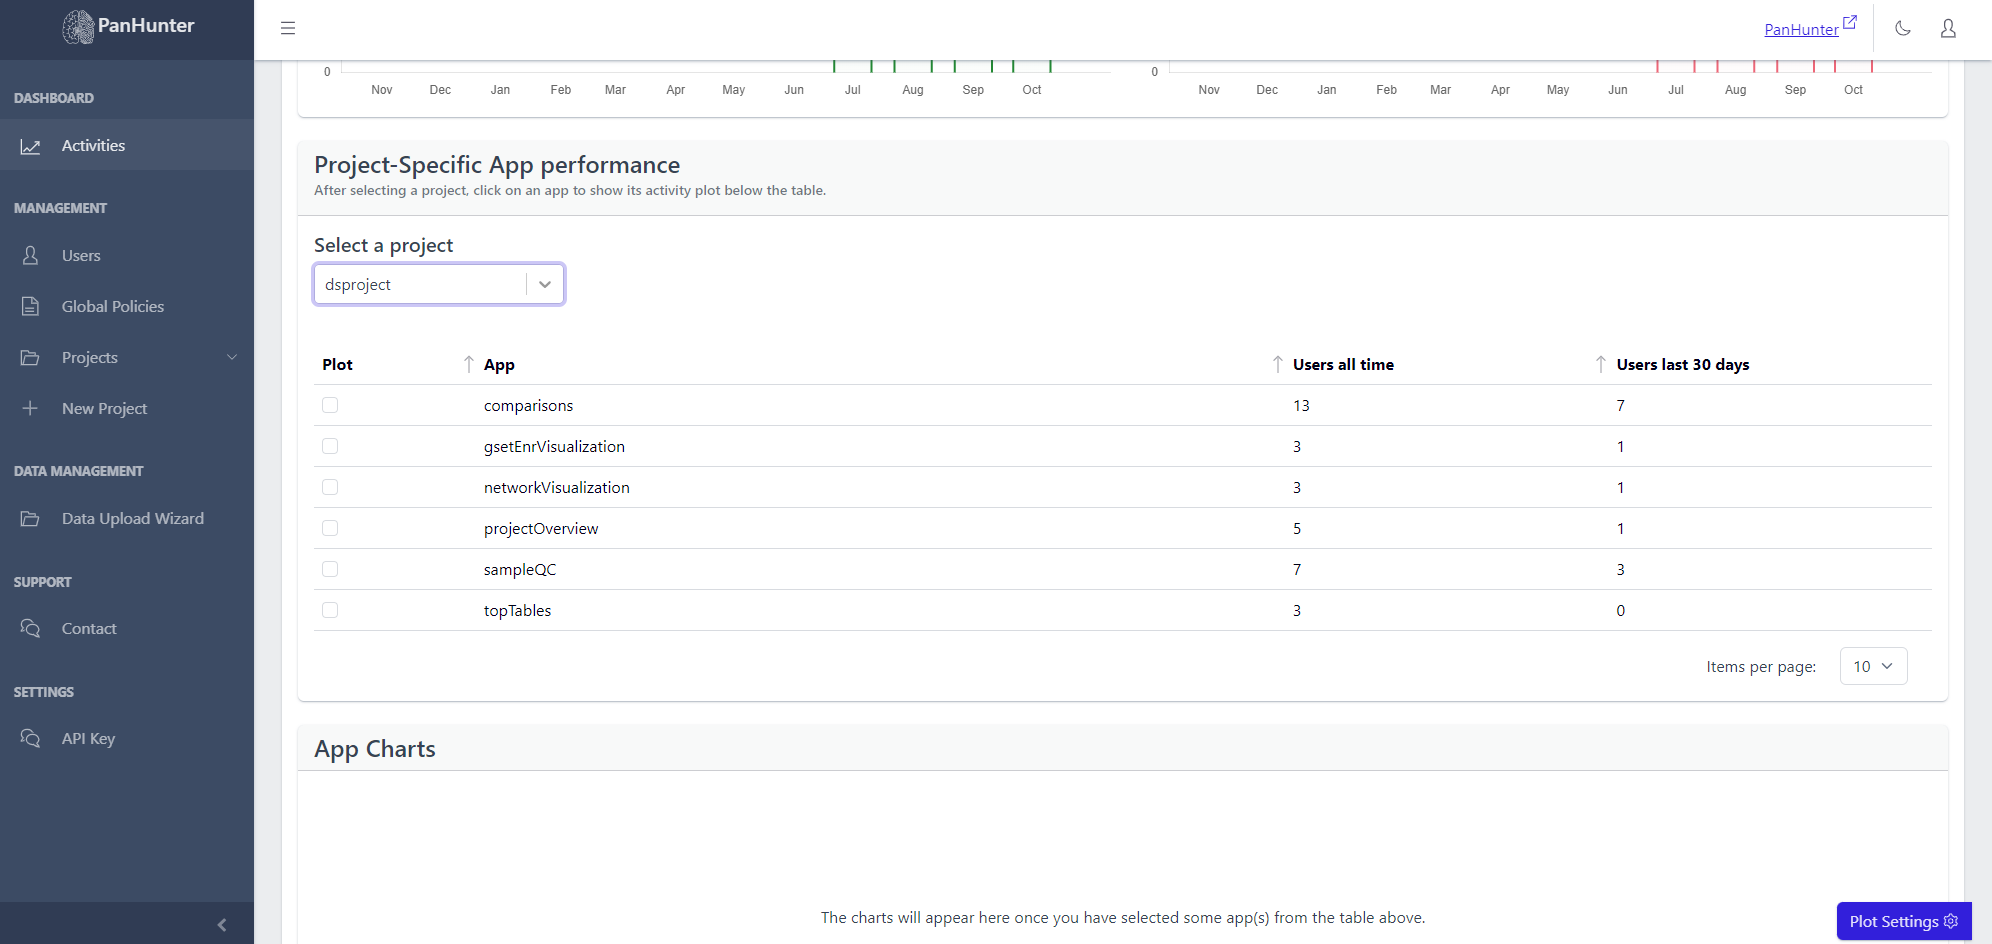 Selecting a row displays additional plots with the number of active users, and number of active hours, for this app.
4.6 - Curtain Call: Deleting A Project
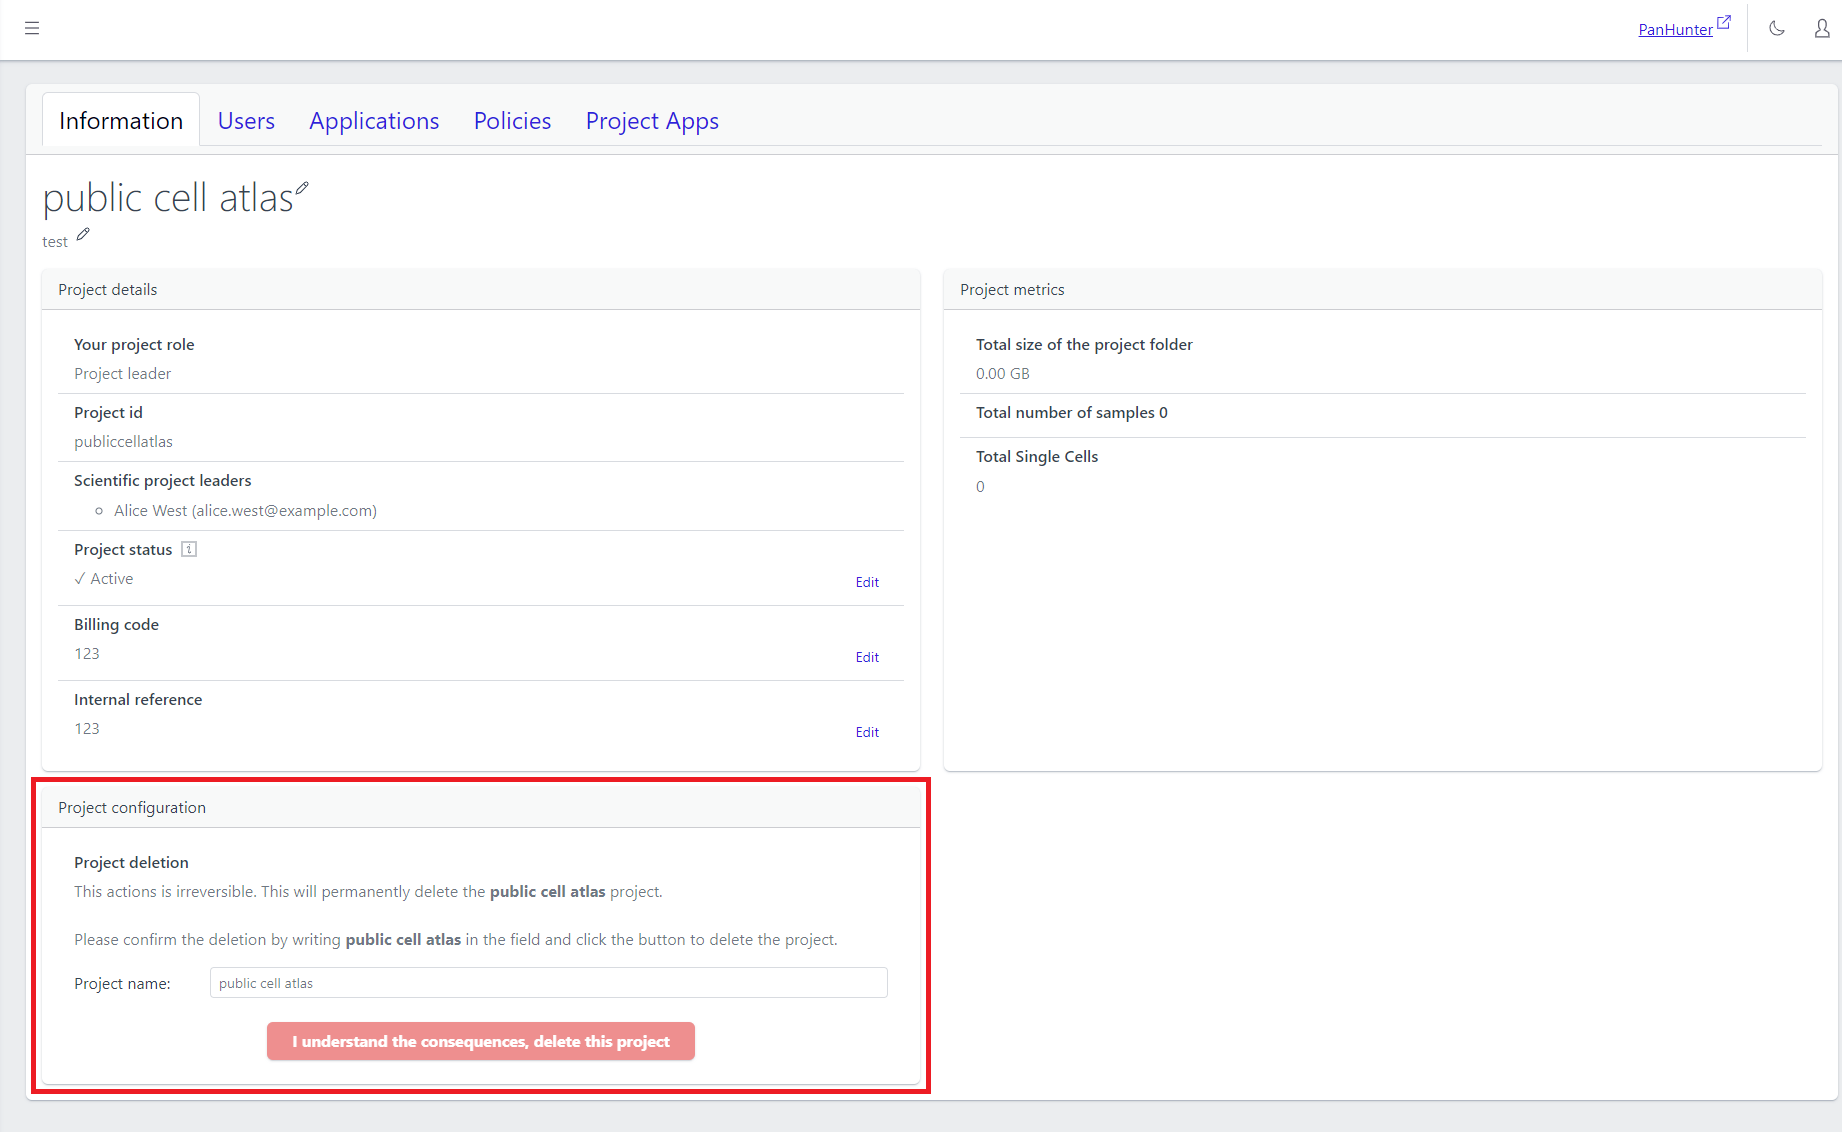
To delete a project, go to the project’s Information page.
For confirmation, enter the name of the project in the provided text box and click on “I understand the consequences, delete this project”. After confirming one last time, the deletion is executed.
A project, once deleted, cannot be recovered.
4.7 - Your Project, Your Rules: Using Project Policies
Info
Functionality described here requires a project leader role. For admins without a project leader role it is not available.
A project leader can add or remove project policies that must be accepted to get involved in a project.
Adding a New Policy
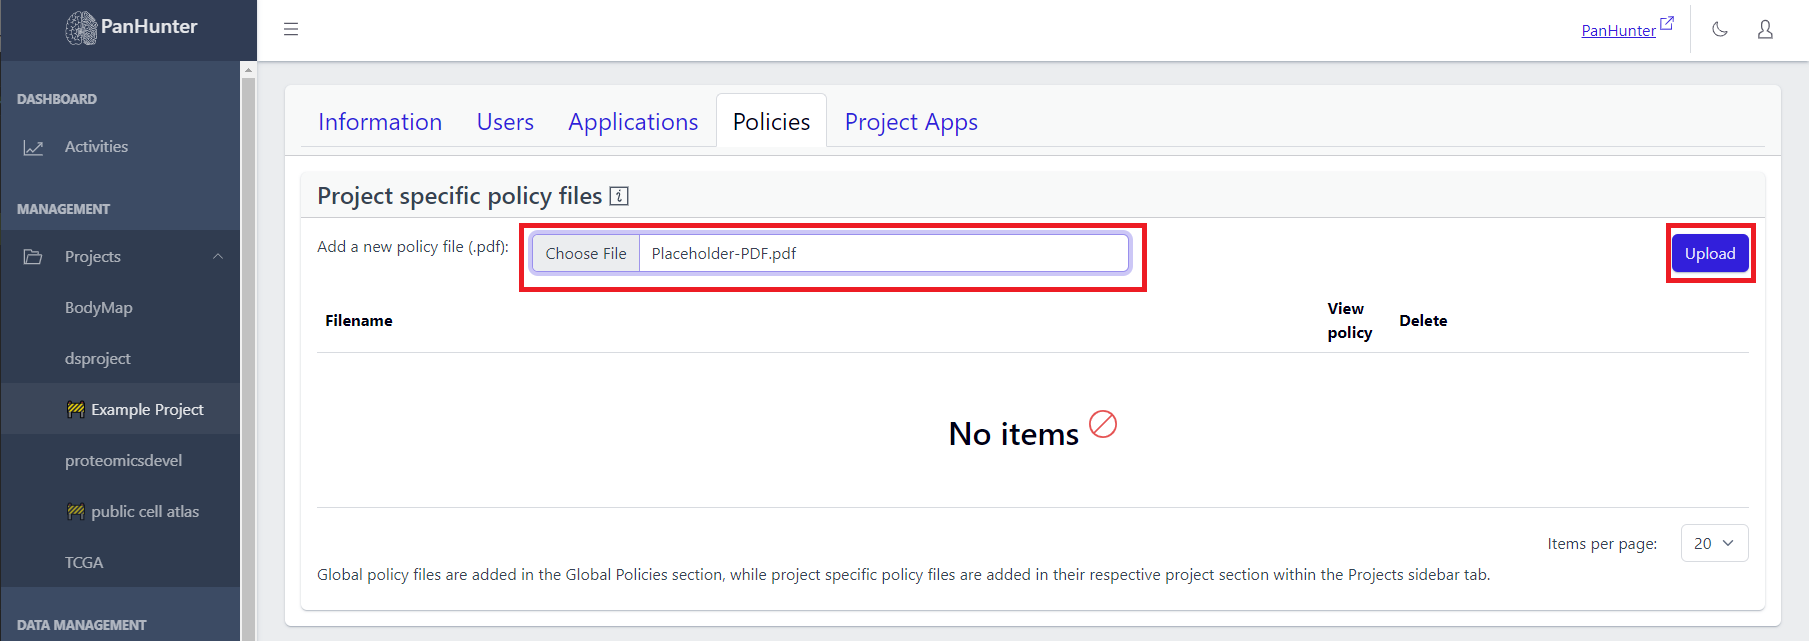
A project leader can upload a policy by clicking “Choose File”, selecting the policy PDF from their local machine (other formats are currently not supported), and clicking the “Upload” button.
Viewing and Deleting Existing Policies

A list of existing policies can be seen, with the policy name, a download button to view the policy, and a delete button to remove the policy displayed.
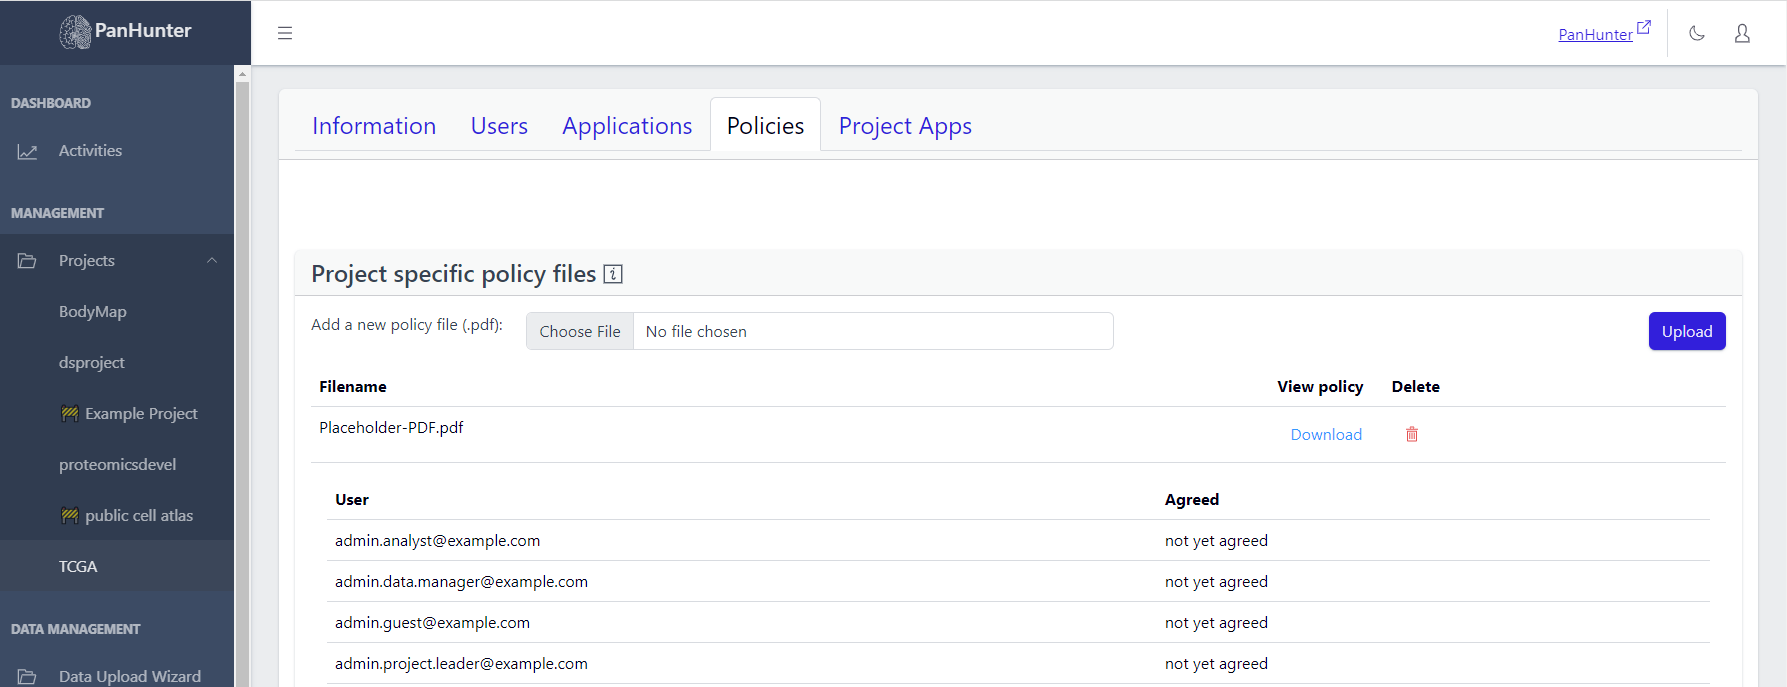
Clicking on one of the policies reveals the list of Project Users, with the date they agreed to this policy, or, if not found, “Not yet agreed”.
📝 Note: Global policy files are added in the Global Policies section, while project specific policy files are added in their respective project section within the Projects sidebar tab.
4.8 - Getting People Involved: Managing Project Users
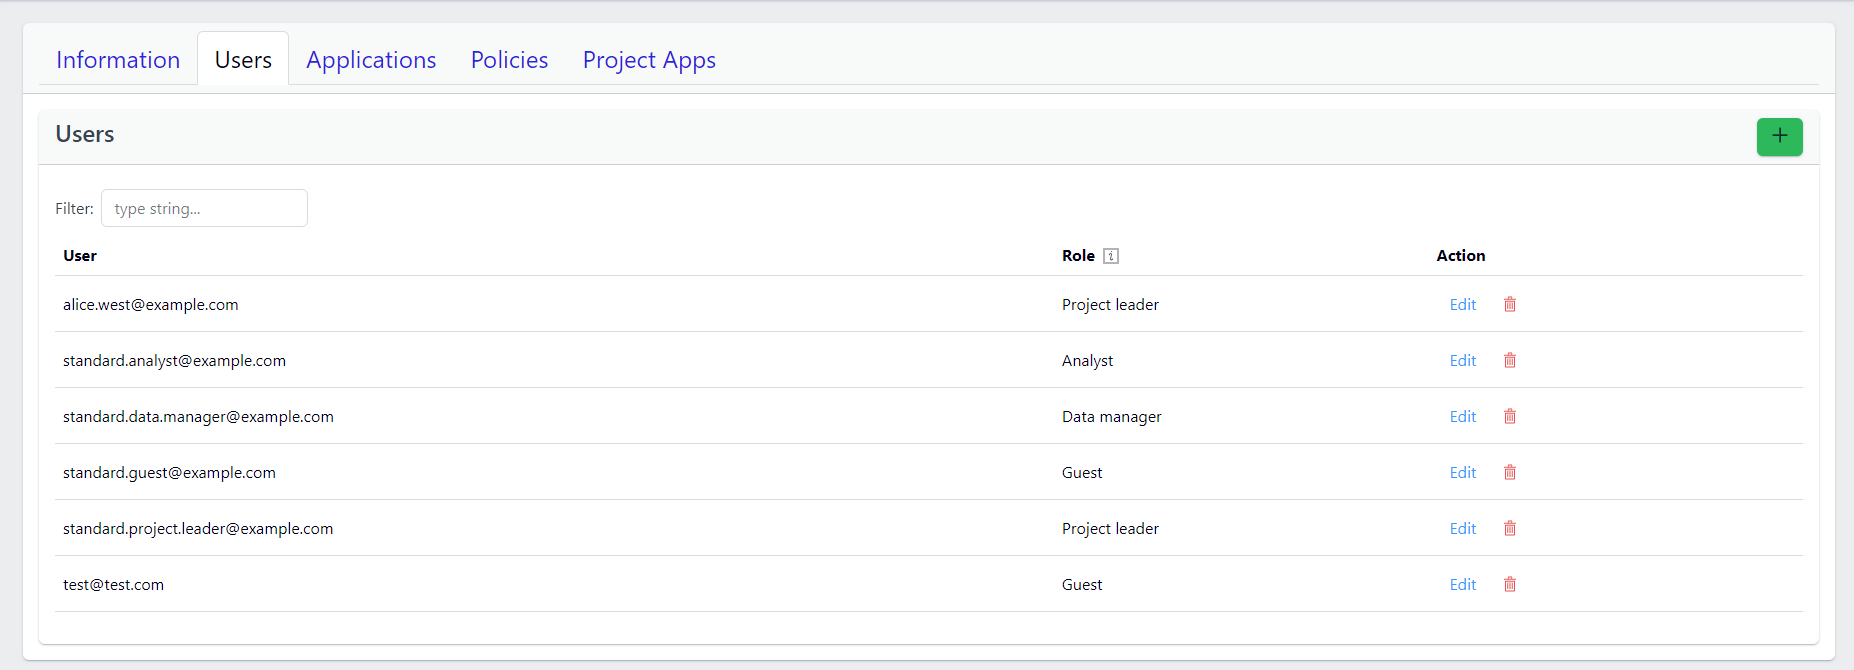
A project leader can not only view the users within a project, they can also add users, delete users, or change the roles of existing users. To do this, they should select a project in the sidebar, and go to the Users tab.
This tab provides a list of users and their role in the project.
- There is a ‘Filter’ option for searching existing users from the user list.
- Additionally, you can edit the user information using the Edit option and also remove them using the Delete option.
- Near the ‘Role’ header, there is an information ‘i’ icon, hovering over it gives you a description about the roles which can be assigned to the users.

Adding users can be done by clicking on the “+” button, and editing and deleting users can be done via the action column visible to project leaders.
Adding users
To add users, a project leader should click on the “+” button, enter the registration e-mail of a PanHunter user, and select the desired role from the drop-down list.

Click the “+” button in the pop-up window next to the specified user enables adding further users, and the “trash symbol” button to remove any users not to add.
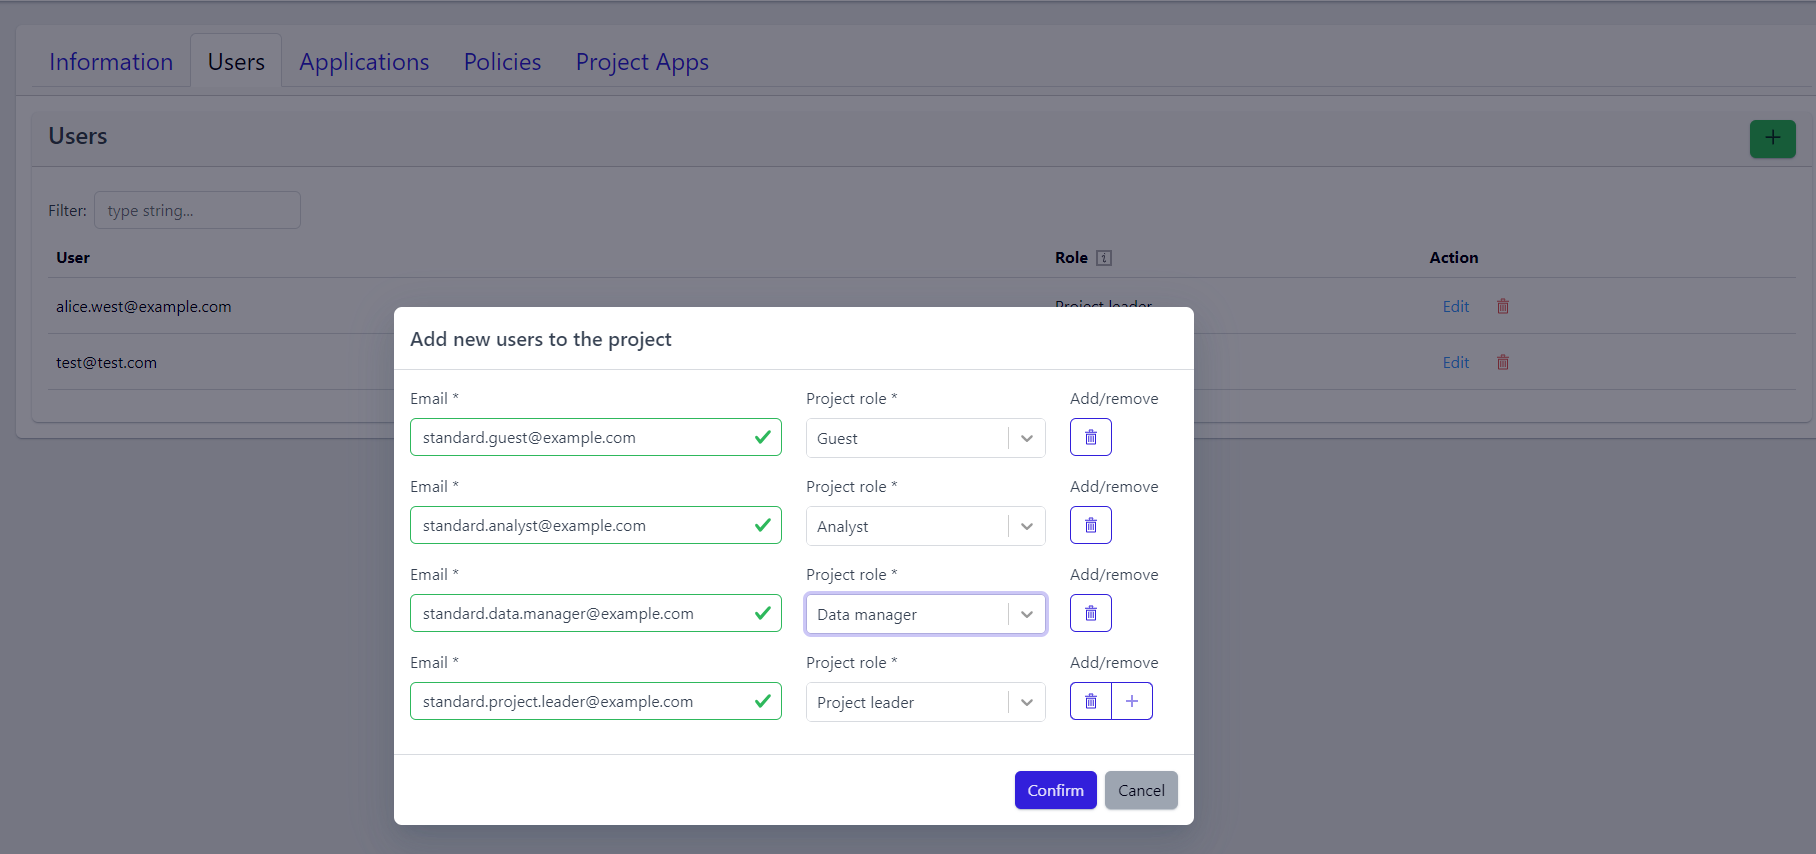
Once the project leader confirms, the pop-up window closes and the users are added to the project.
📝 Note: User email addresses first need to be registered to the instance. In case you can’t find user email address, please contact the instance admin or PanHunter Support.
Editing Users
To edit a user´s role, a project leader should click on “Edit” in that user´s row, select the new role from the drop-down list, and confirm.
Deleting Users
To delete a user, a project leader should click on the “Trash icon” symbol, and confirm their decision. That user is then removed from the project, though they remain a PanHunter user.
5 - A Better Picture: A Global Overview In The Activities Tab
On the Activities page, an administrator can see how many users regularly login to PanHunter, how many projects currently exist, and get additional information on overall app usage in addition to the project information a project leader has access to. Hovering over one of the plot bars gives exact numbers.
Choosing a time Interval
Clicking Plot Settings in the bottom right corner reveals a menu governing all graphs on the page, allowing to choose the time period covered and the granularity of the interval displayed.
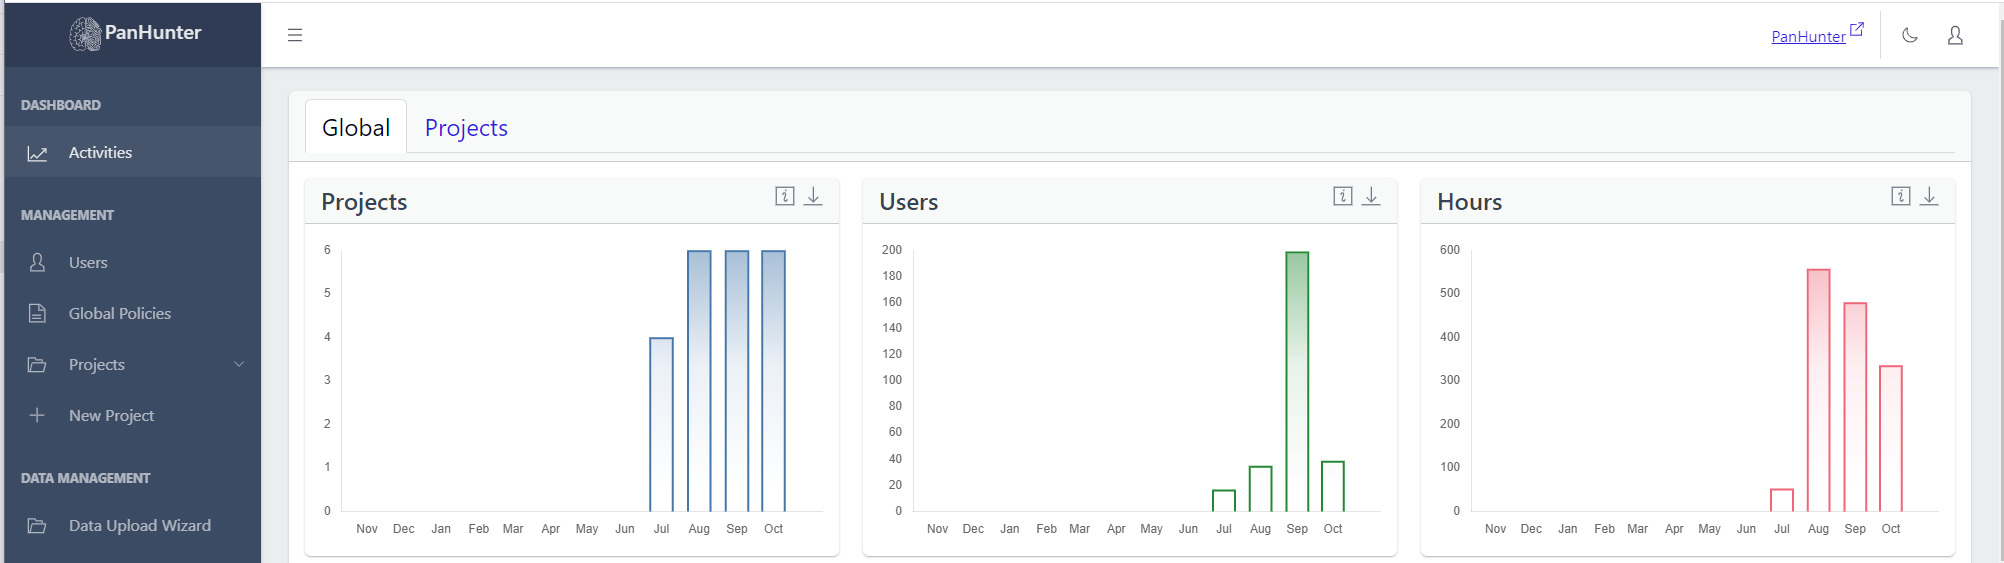 Displayed are the number of active projects (projects present in at least one user’s browser tabs), number of active users (users with PanHunter open), and number of active hours (total amount of time in hours that PanHunter was opened in user’s browser tabs). This data is aggregated across all projects. To get more information about a specific project, see here.
To access this, go to Activities, go to the Global tab and scroll down.
Displayed is a table with the names of the apps, the number of users who ever accessed this app, and the number of users who accessed this app in the last 30 days. Selecting a row displays additional plots with the number of active users, and number of active hours, for this app.
This data is aggregated across all projects. To get access to information about an app within a project, see here.
6 - Getting Started: Creating A New Project
You reach the Admin App via your initials in the to right corner and then clicking Admin App.
To create a new project, an user must go to the New Project tab in their side bar and fill in and submit the corresponding form.
At minimum, a project name, a project identifier, at least one species and at least one project leader must be selected.
Once this is done, the project is created within the admin app and set to be in maintenance, and our support team is notified of the project to setup.
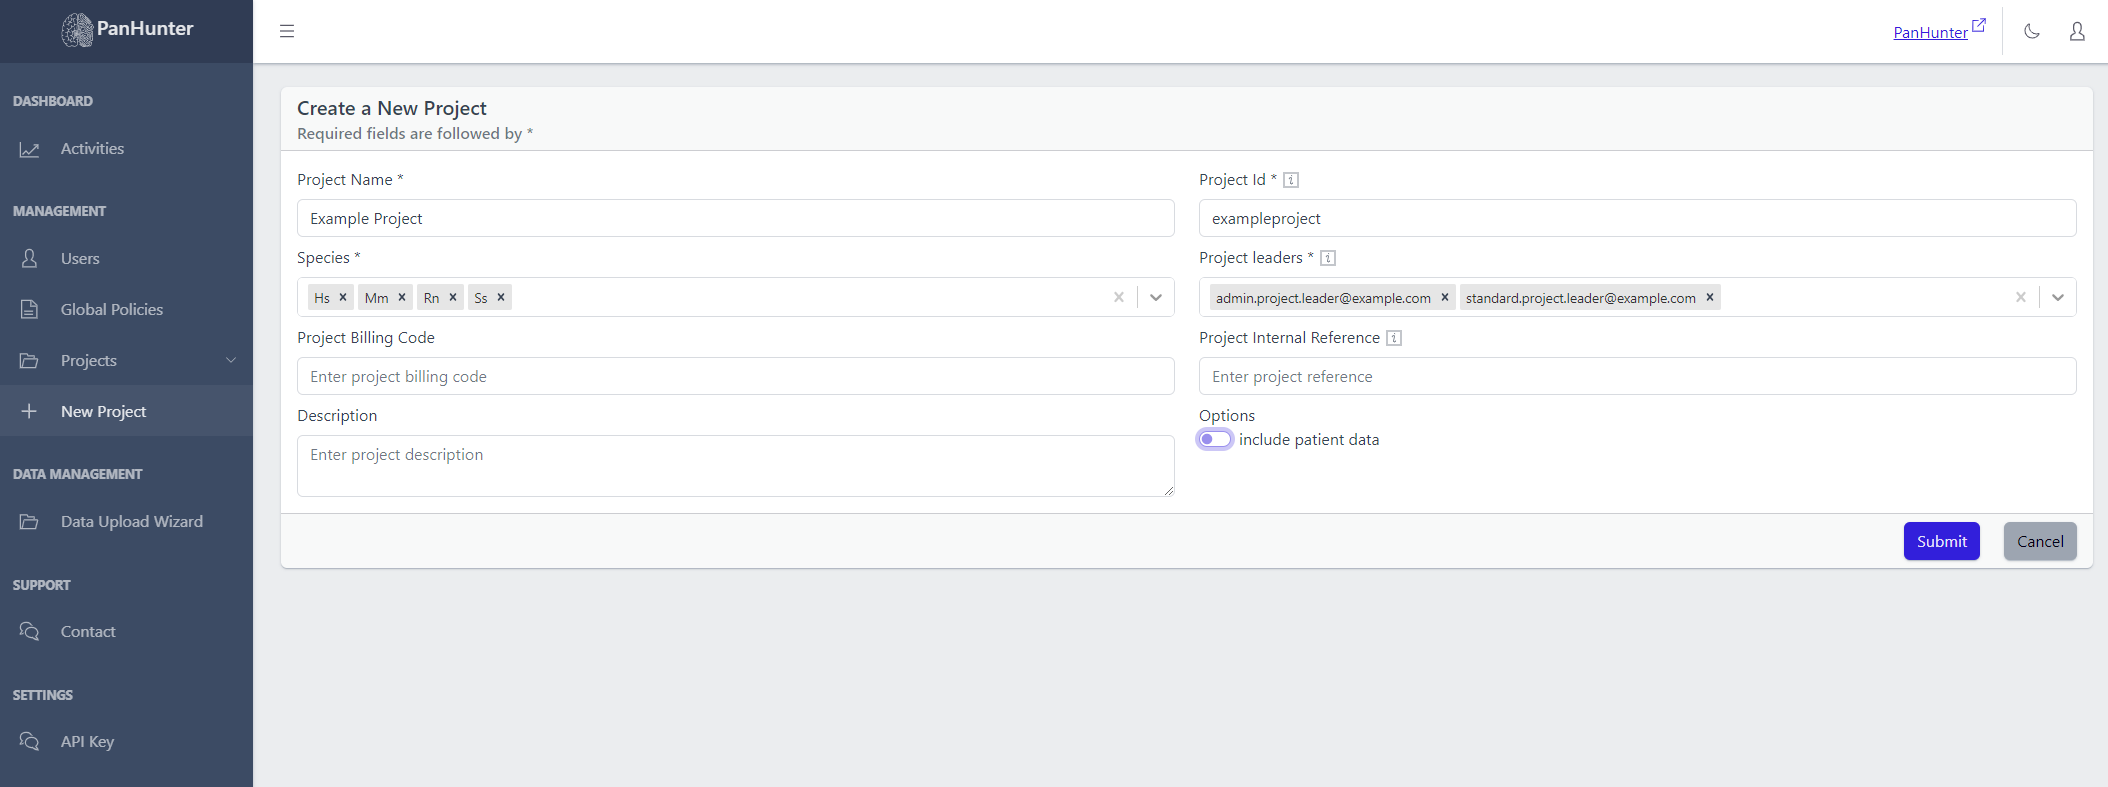
The following sections will give a few more details about each of the parameters:
Project Name
Mandatory for project creation. Can later be altered within a project.
A name for the project, displayed and editable on the Project Information page once reached via the sidebar. This is the label in the sidebar corresponding to the project. This is also displayed on the PanHunter Start Page allowing project selection.
Project Identifier
Mandatory for project creation.
Cannot be altered after creation.
A unique identifier used internally within PanHunter to identify a project. Only allows lowercase letters or numbers.
Species
Mandatory for project creation.
Cannot be added or removed from a project after creation.
Which species PanHunter should support for this project.
One or more species must be selected at creation, via the abbreviation of their latin name.
Currently supported are:
- Hs (Homo sapiens, human)
- Mm (Mus musculus, house mouse)
- Rn (Rattus norvegicus, brown rat)
- Ss (Sus scrofa, pig)
Project leaders
- Mandatory for project creation. The requestor is automatically added and cannot be removed while filling the form.
- Can later be altered within a project.
- Users set to be Project Leaders for a project at its creation.
- At least one must be selected.
- Users can be selected via their registration e-mail address in PanHunter.
- Project leaders will be displayed as Scientific Project Leaders within the project´s information.
Billing code
Optional.
Can later be altered within a project.
A field allowing entry of a billing code if desired.
Internal reference
Optional.
Can later be altered within a project.
A field allowing entry of an internal reference if desired.
Description
Optional.
Can later be altered within a project.
A field allowing entry of a description for the project if desired.
Include Patient Data
Optional.
Cannot be altered after creation.
If toggled on, this will signal our support team to create appropriate folders for patient data while performing project setup. This allows us follow General Data
Protection Regulation (GDPR).